Backup and Restore of Kubernetes Applications using Velero -Openstack/Cinder

In this blog post we will be using Openstack/Cinder as our underlying storage provider and Heptio’s Velero for backup and restore of our application

Restic Plugin

Starting with 0.9 version thanks to Restic support, Velero now supports taking backup of almost any type of Kubernetes volume regardless of the underlying storage provider.

Note: Unfortunately it’s not supporting Openstack/Cinder storage class. Let’s see in this blog how to fix

Velero Architecture

Work flow

When you run velero backup create test-backup:

  1. The Velero client makes a call to the Kubernetes API server to create a Backup object.
  2. The BackupController notices the new Backupobject and performs validation.
  3. The BackupController begins the backup process. It collects the data to back up by querying the API server for resources.
  4. The BackupController makes a call to the object storage service – for example, AWS S3 – to upload the backup file.

How does Restic works with Velero?

Three more Custom Resource Definitions and their associated controllers are introduced for Restic support.

  • Restic Repository
  • PodVolumeBackup
  • PodVolumeRestore

Let’s start Velero !!

Kubernetes Environment Pre-Requisites

  1. Helm
  2. Ingress
  3. Persistent storage ( default storage class set)

Kubernetes Clusters

  1. Cluster Z: Minio Cluster ( Kubernetes cluster for hosting minio, object storage for backup storage)
  2. Cluster A: Old Cluster ( Application to migrate from )
  3. Cluster B: New Cluster ( Application to migrate to )


Deploying Object based storage – minio on Cluster Z


helm install --name minio --namespace minio --set accessKey=minio,secretKey=minio123,persistence.size=100Gi,service.type=NodePort stable/minio

1. Login to minio with access key minio & secret key minio123

2. Create a bucket by name kubernetes

Install velero client on Cluster A

wget https://github.com/heptio/velero/releases/download/v1.0.0/velero-v1.0.0-linux-amd64.tar.gz
tar -xvf velero-v1.0.0-linux-amd64.tar.gz 
cp velero-v1.0.0-linux-amd64/velero /usr/bin

Create velero credentials-velero file ( with minio access key & secret key) on Cluster A

vim credentials-velero 
[default]
aws_access_key_id = minio
aws_secret_access_key = minio123

Install velero server on Cluster A

velero install  --provider aws --bucket kubernetes --secret-file credentials-velero --use-volume-snapshots=true --backup-location-config region=minio,s3ForcePathStyle="true",s3Url=http://10.157.249.168:32270 --snapshot-location-config region=minio,s3ForcePathStyle="true",s3Url=http://10.157.249.168:32270 --use-restic

Install Sample application, i will be deploying wordpress on Cluster A

helm install --name wordpress --namespace wordpress --set ingress.enabled=true,ingress.hosts[0].name=wordpress.jaws.jio.com  stable/wordpress

Annotate volume to be backuped, since by default cinder storage class doesn’t support snapshotting on Cluster A

kubectl -n wordpress describe pod/wordpress-mariadb-0
...
Volumes:
  data:
    Type:       PersistentVolumeClaim (a reference to a PersistentVolumeClaim in the same namespace)
    ClaimName:  data-wordpress-mariadb-0
    ReadOnly:   false
  config:
    Type:      ConfigMap (a volume populated by a ConfigMap)
    Name:      wordpress-mariadb
    Optional:  false
  default-token-r6rpc:
    Type:        Secret (a volume populated by a Secret)
    SecretName:  default-token-r6rpc
    Optional:    false
...
kubectl -n wordpress annotate pod/wordpress-mariadb-0 backup.velero.io/backup-volumes=data,config
kubectl -n wordpress describe pod/wordpress-557589bfbc-7pzqb
...
Volumes:
  wordpress-data:
    Type:       PersistentVolumeClaim (a reference to a PersistentVolumeClaim in the same namespace)
    ClaimName:  wordpress
    ReadOnly:   false
  default-token-r6rpc:
    Type:        Secret (a volume populated by a Secret)
    SecretName:  default-token-r6rpc
    Optional:    false
...
kubectl -n wordpress annotate pod/wordpress-557589bfbc-7pzqb backup.velero.io/backup-volumes=wordpress-data

Create a backup on Cluster A

 velero backup create  wp-backup --snapshot-volumes --include-namespaces wordpress

Install velero client on Cluster B

wget https://github.com/heptio/velero/releases/download/v1.0.0/velero-v1.0.0-linux-amd64.tar.gz
tar -xvf velero-v1.0.0-linux-amd64.tar.gz 
cp velero-v1.0.0-linux-amd64/velero /usr/bin

Create velero credentials-velero file ( with minio access key & secret key) on Cluster B

 vim credentials-velero 
[default]
aws_access_key_id = minio
aws_secret_access_key = minio123

Install velero server on Cluster B

velero install  --provider aws --bucket kubernetes --secret-file credentials-velero --use-volume-snapshots=true --backup-location-config region=minio,s3ForcePathStyle="true",s3Url=http://10.157.249.168:32270 --snapshot-location-config region=minio,s3ForcePathStyle="true",s3Url=http://10.157.249.168:32270 --use-restic

Restore from backup on Cluster B

velero restore create wordpress-restore --from-backup wp-backup --restore-volumes=true

Wait & Verify Restore from backup on Cluster B

kubectl -n wordpress get pods -w
kubectl -n wordpress get pods
NAME                         READY   STATUS    RESTARTS   AGE
wordpress-68cd5f85c6-gr5vp   1/1     Running   0          2m29s
wordpress-mariadb-0          1/1     Running   0          2m24s

Scheduled Backups

Taking a backup manually happens only in an emergency situation or for educational purposes. The real essence of a backup and disaster recovery plan is to have scheduled backups. Ark provides that support in a rather simple manner.

$ velero schedule create daily-wordpress-backup–schedule=”0 10 * * *” –include-namespaces wordpress
Schedule “wordpress-backup” created successfully.

Troubleshooting

In case you are facing any issues regarding the setting up of the kubernetes cluster. Please make sure you have enough physical resources to spin up 3 VM’s. If not you can modify the Vagrantfile as mentioned in the README for the repository to increase/decrease the number of nodes.

For issues related to velero , there are a few commands that may be helpful

$ velero backup describe <backupName>
$ velero backup logs <backupName>
$ velero restore describe <restoreName>
$ velero restore logs <restoreName>

For comprehensive troubleshooting regarding velero, please follow this link.

Cleanup

If you don’t need the cluster anymore, you can go ahead and destroy the cluster

$ cd $HOME/ark-rook-tutorial/k8s-bkp-restore
$ vagrant destroy -f
$ rm -rf $HOME/ark-rook-tutorial

Reference

https://github.com/heptio/velero

How To Set Up an NFS Mount on Ubuntu 16.04

In this article, we will learn how to install NFS on Ubuntu 16.04Network File System (NFS) protocol and a filesystem which allows you to access the shared folders from the remote system or server and also allows you to mount as a remote directory on the servers. This allows you to share the storage space between different clients in different locations. NFS has been always the easiest way to access the remote storages over a network.

To accomplish this demo, we need two systems which Ubuntu installed and user with sudo permissions with a private network.


Installing the Packages on Server

We will install the ‘nfs-kernel’, which will be allowed us to share the directories on the server to share the files and folders. Below is the command to install the nfs package.

$ sudo apt-get update
$ sudo apt-get install nfs-kernel-server -y

Installing the Packages on Client Side

We have to install the nfs packages on the client in general nfs-common ie., the package which provides the access to the NFS share folders from the server.

$ sudo apt-get update
$ sudo apt-get install nfs-common -y

Note: on client make sure ‘rpcbind’ is running or not, else run “systemctl restart” rpcbind”


Enabling and Creating the Share Directories on the Server

Here for demo purpose, we are going to share two folders to differentiate the configuration, setting, First one is with superuser permission and other with trusted users on the client system.

Exporting a General Mount

In this example, we will create a general NFS mount that with the default configuration which is difficult for a user without any permissions on the client machine they can access and this can be used to create a shared space to store the project files in the folders.

Creating a Shared Folder for General Purpose

$ sudo mkdir /usr/nfs/common –p

Change the folder permission, so that anybody can write in the folder

$ sudo chown nobody:nogroup /usr/nfs/common

And now try to access the folder from a client with the below command

Before we mount any shared folder on the client, we needed to create a mount point on the client machine

$ sudo mkdir /mnt/nfs/common
$ sudo mount 192.168.1.25:/usr/nfs/common /mnt/nfs/common

This will mount the NFS share on the server 192.168.1.25 on the client machine with /mnt/nfs/common is mounted at /mnt/nfs/common on the client machine and it can be accessed as a local folder.

Creating a Shared folder with Home Directory

We will share user home directories stored on the server to access from the client, the access needed to conveniently manage the users.

Configuring the NFS Settings on the Server

As we are seeing 2 types of NFS  Share, let”s see how to configure the setting to match our requirements.

Open /etc/exports file with an editor

$ sudo vi /etc/exports
# /etc/exports: the access control list for filesystems which may be exported
# to NFS clients. See exports(5).
#
# Example for NFSv2 and NFSv3:
# /srv/homes hostname1(rw,sync,no_subtree_check) hostname2(ro,sync,no_subtree_check)
#
# Example for NFSv4:
# /srv/nfs4 gss/krb5i(rw,sync,fsid=0,crossmnt,no_subtree_check)
# /srv/nfs4/homes gss/krb5i(rw,sync,no_subtree_check)

Add below lines to the configuration file –

/usr/nfs/common                192.168.1.100(rw,sync,no_subtree_check)
/home                          192.168.1.100(rw,sync,no_root_squash,no_subtree_check)

Below is the explanation for each option we used in the above  commands which we used.

Rw -> This will allow client computers to read and write to the share.

Sync -> This will allow the data to be written in the NFS before it applies to queries and It also increase consistent environment and will be stable.

Nosubtreecheck -> This will prevent subtree checking, where if we enable this option, it will cause many problems if the client has opened the file.

Norootsquash -> This will makes the NFS translation request from the root user for the client into a not –privileged users of the server, where it will also prevent the root account on the client from using the file system of the server as root.

$ sudo systemctl restart nfs-kernel-server

Mounting the Directories on the Client

Before, we mount the share folders on the client, we needed to create a mount point and we will link the share folder from the NFS server to the local folders (mount points).

$ mkdir /mnt/common
$ mkdir /mnt/home
$ sudo mount 192.168.1.100:/usr/nfs/common /mnt/common
$ sudo mount 192.168.1.100:/home /mnt/home

After we run the commands we will not verify that the NFS share folders are mounted correctly or not

$ df –h
Filesystem                Size  Used Avail Use% Mounted on
udev                      538M     0  538M   0% /dev
tmpfs                     249M  628K   249M   2% /run
/dev/vda1                 100G  10G   90G  10% /
tmpfs                     445M     0  445M   0% /dev/shm
tmpfs                     10.0M    0  10.0M   0% /run/lock
tmpfs                     245M     0  245M   0% /sys/fs/cgroup
tmpfs                     249M     0   249M   0% /run/user/0
192.168.1.100:/home      124G  11.28G   118.8G   9% /mnt/home
192.168.1.100:/usr/nfs/common   124G  11.28G   118.8G   9% /mnt/common

As we can see that they both share are mounted and we can see them at the bottom, as they are mounted from the same server so we can see the same disk usage.

Mounting the NFS Share at the Boot Time

We can mount the NFS share at the time of boot so that if we needed to connect the NFS share folders, we can directly access the folders at the mount points

Open the /etc/fstab file and add the below lines.

$ sudo vi /etc/fstab

Add the below line at the bottom of the files

. . .
192.168.1.100:/usr/nfs/common    /mnt/general   nfs auto,nofail,noatime,nolock,intr,tcp,actimeo=1800 0 0
192.168.1.100:/home              /mnt/home      nfs auto,nofail,noatime,nolock,intr,tcp,actimeo=1800 0 0

Unmounting the NFS Share Folders

As if we do not want to use the folders, we can unmount the NFS share folders using the below commands

$ sudo umount /mnt/common
$ sudo umount /mnt/home

Openstack – Delete Cinder Stuck Volume

Recently, I was using Devstack/Ocata version of OpenStack and was trying to  attach/detach volumes to an instance. Every once in a while, volumes would go to an   ‘in-use’ state even after the instance was destroyed.

In fact, even in other releases, I have seen cinder volumes stuck in in-use or error state and sometimes not being able to delete those.

If the volume is in ‘in-use’ status, you first have to change to an available status though before you can issue a delete:

cinder reset-state –state available $VOLUME_ID

cinder delete $VOLUME_ID

If ‘cinder delete’ doesn’t work and you have admin privileges, you can try force-delete.

cinder force-delete $VOLUME_ID

But may be that will fix it. May be it will not. If the volume is still stuck, try going to the database and setting the status of the volume to a detached state:

update volume_attachment setattach_status="detached"where id="<attachment_id>";
update volumes setattach_status="detached"where id="<volume_id>";
Once I did that, I was able to delete or force-delete any stuck volumes. 🙂

Openstack Docker Networking – Issues Roadmap & Resolution steps

In this blog we are going to see common issues with docker networking and steps to consider for configuration and troubleshooting ways.

Common Issues discussed in stackoverflow, docker forum and ask.openstack

  • Openstack Networking is a complex topic and Docker networking is continuously evolving in every release and this makes it difficult for folks to figure out the right feature to use for their use-case
  • When applications are taken from development to production, networking needs change and the typical approaches don’t always help.
  • Enterprise customers have lot of legacy applications and the networking needs to satisfy connecting legacy non-containerized applications with the new container based micro services.

Resolution Methods & Considerations with docker infra management

  • Docker Networking Components, Docker Daemon includes accessing remotely & securely, Corporate Firewall considerations, preventing IP table modification, Container networking, Swarm/Service networking includes Routing Mesh vs HRM & Troubleshooting methods for resolving docker networking issues.


Here link to my slides, Please add input corrections need to changes .


References:

https://wiki.openstack.org/wiki/Docker

https://www.docker.com/docker-community

Dockercon videos around networking topics

Terraform – Install and Orchestrate Part-1

Introduction

The primitives of terraform used to define infrastructure as a code (IaaC). You can build, change and version your infrastructure in AWS, Digital Ocean, Google Cloud, Heroku, Microsoft Azure etc. using the same tool. Describe components of your single application or entire data center using terraform. In this tutorial, we will create an infrastructure using terraform and provision AWS EC2 instance.

Install Terraform

To install Terraform, find the appropriate package for your system and download it. Terraform is packaged as a zip archive.

After downloading Terraform, unzip the package. Terraform runs as a single binary named terraform. Any other files in the package can be safely removed and Terraform will still function.

The final step is to make sure that the terraform binary is available on the PATH. See this page for instructions on setting the PATH on Linux and Mac. This page contains instructions for setting the PATH on Windows.

[pandy@maestropandy ~]$ cd /usr/local/src
[root@maestropandy]# wget https://releases.hashicorp.com/terraform/0.9.11/terraform_0.9.11_linux_amd64.zip?_ga=2.158618490.1572651985.1499345696-1866648534.1499345696

[root@maestropandy]# unzip terraform_0.9.11_linux_amd64.zip\?_ga\=2.158618490.1572651985.1499345696-1866648534.1499345696

[root@maestropandy]# mv terraform /usr/local/bin/

Now add the following line to add terraform in PATH location.

export PATH=$PATH:/terraform-path/

Verify Installation

[root@maestropandy]# terraform
Usage: terraform [–version] [–help] <command> [args]

The available commands for execution are listed below.
The most common, useful commands are shown first, followed by
less common or more advanced commands. If you’re just getting
started with Terraform, stick with the common commands. For the
other commands, please read the help and docs before usage.

Common commands:
apply Builds or changes infrastructure
console Interactive console for Terraform interpolations
destroy Destroy Terraform-managed infrastructure
env Environment management
fmt Rewrites config files to canonical format
get Download and install modules for the configuration
graph Create a visual graph of Terraform resources
import Import existing infrastructure into Terraform
init Initialize a new or existing Terraform configuration
output Read an output from a state file
plan Generate and show an execution plan
push Upload this Terraform module to Atlas to run
refresh Update local state file against real resources
show Inspect Terraform state or plan
taint Manually mark a resource for recreation
untaint Manually unmark a resource as tainted
validate Validates the Terraform files
version Prints the Terraform version

All other commands:
debug Debug output management (experimental)
force-unlock Manually unlock the terraform state
state Advanced state management


Now succesfully Terraform installed on ubuntu machine, lets create AWS user account, and download keys.

  1. Click Users from IAM dashboard.
  1. Click “Add user”
  1. Provide an user name and click only “Programmatic access”. We have provided user name as “terraformuser”. Click “Next:Permission”
  1. Next click “Create Group”. Provide a group name and in the policy type, filter by AmazonEC2. Select the first row which which gives Amazon EC2 full access.
  1. Click “Next: Review”
  1. Click “Create user”

Download the newly created users Access key ID and Secret key by clicking “Download .csv’. These credentials are needed to connect to Amazon EC2 service through terraform.

Convert .pem key into .ppk format your use.

Terraform file

As we are already aware that terraform is a command line tool for creating, updating and versioning infrastructure in the cloud then obviously we want to know how does it do so? Terraform describes infrastructure in a file using the language called Hashicorp Configuration Language (HCL) with the extension of .tf It is a declarative language that describes infrastructure in the cloud. When we write our infrastructure using HCL in .tf file, terraform generates an execution plan that describes what it will do to reach the desired state. Once execution plan is ready, terraform executes the plan and generates a state file by the name terraform.tfstate by default. This file maps resource meta data to the actual resource ID and lets terraform knows what it is managing in the cloud.

Terraform and provision AWS

To deploy an EC2 instance through terraform create a file with extension .tf This file contains namely two section. The first section declares the provider (in our case it is AWS). In provider section we will specify the access key and secret key that is written in the CSV file which we have downloaded earlier while creating EC2 user. Also choose the region of your choice. The resource block defines what resources we want to create. Since we want to create EC2 instance therefore we specified with “aws_instance” and the instance attributes inside it like ami, instance_type and tags. To find the EC2 images browse ubuntu cloud image.

[root@maestropandy]# cd
[root@maestropandy ~]# mkdir terraform
[root@maestropandy ~]# cd terraform/
[root@maestropandy terraform]# vi aws.tf

provider “aws” {
access_key = “ZKIAITH7YUGAZZIYYSZA”
secret_key = “UlNapYqUCg2m4MDPT9Tlq+64BWnITspR93fMNc0Y”
region = “ap-southeast-1”
}

resource “aws_instance” “example” {
ami = “ami-83a713e0”
instance_type = “t2.micro”
tags {
Name = “your-instance”
}
}

Apply terraform plan first to find out what terraform will do. The terraform plan will let us know what changes, additions and deletions will be done to the infrastructure before actually applying it. The resources with ‘+’ sign are going to be created, resources with ‘-‘ sign are going to be deleted and resources with ‘~’ sign are going to be modified.

[root@maestropandy terraform]# terraform plan

Now to create the instance, execute terraform apply


[root@maestropandy terraform]# terraform apply

aws_instance.example: Creating…
ami:                                                   “” => “ami-83a713e0”
associate_public_ip_address:             “” => “<computed>”
availability_zone:                                “” => “<computed>”
ebs_block_device.#:                          “” => “<computed>”
ephemeral_block_device.#:                “” => “<computed>”
instance_state:                                    “” => “<computed>”
instance_type:                                     “” => “t2.micro”
key_name:                                          “” => “<computed>”
network_interface_id:                         “” => “<computed>”
placement_group:                               “” => “<computed>”
private_dns:                                        “” => “<computed>”
private_ip:                                          “” => “<computed>”
public_dns:                                         “” => “<computed>”
public_ip:                                           “” => “<computed>”
root_block_device.#:                          “” => “<computed>”
security_groups.#:                              “” => “<computed>”
source_dest_check:                           “” => “true”
subnet_id:                                          “” => “<computed>”
tags.%:                                              “” => “1”
tags.Name:                                        “” => “your-instance”
tenancy:                                             “” => “<computed>”
vpc_security_group_ids.#:                 “” => “<computed>”
aws_instance.example: Still creating… (10s elapsed)
aws_instance.example: Still creating… (20s elapsed)
aws_instance.example: Creation complete

Apply complete! Resources: 1 added, 0 changed, 0 destroyed.

The state of your infrastructure has been saved to the path
below. This state is required to modify and destroy your
infrastructure, so keep it safe. To inspect the complete state
use the `terraform show` command.

Next  we head over to EC2 dashboard, we will find that the new instance being initializing.


terraform instance

Now we have successfully created AWS EC2 Instance using Terraform, say cheers to yourself 🙂


Reference

https://www.terraform.io/intro/getting-started/install.html

Tacker Installation Openstack

what is Tacker?

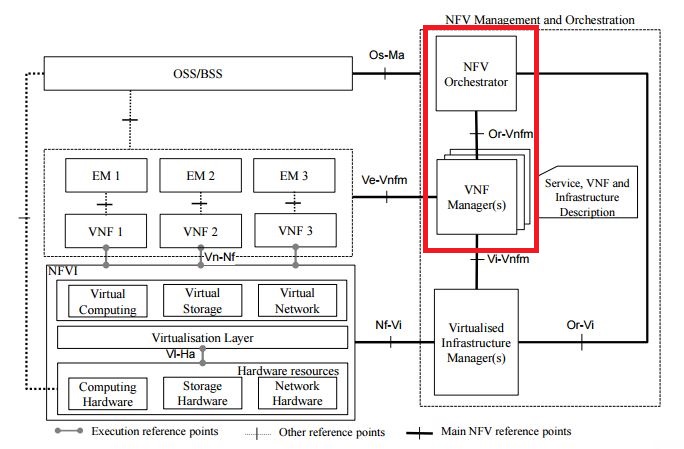
Tacker is an official OpenStack project building a Generic VNF Manager (VNFM) and a NFV Orchestrator (NFVO) to deploy and operate Network Services and Virtual Network Functions (VNFs) on an NFV infrastructure platform like OpenStack. It is based on ETSI MANO Architectural Framework and provides a functional stack to Orchestrate Network Services end-to-end using VNFs.


High Level ArchitectureETSI MANO Tacker.JPG

To know more about architecture  click Tacker

Installation on single node setup (Devstack)

1) Pull devstack repo either master or any stable releases ( do “git clone -b stable/<stable release name>

Note: supported from the Openstack Kilo Release.

git clone https://github.com/openstack-dev/devstack

3) A sample local.conf is placed at https://raw.githubusercontent.com/openstack/tacker/master/devstack/samples/local.conf.example. Copy the local.conf to devstack root directory and customize it based on your environment settings. Update the HOST_IP to the IP address of VM or host where you are running tacker.

Note 1: Ensure local.conf file has the “enable_plugin tacker” line and it is pointing to master.

4) Run stack.sh

Installation on Multinode setup:

Prerequisites:

  • Hardware: minimum 8GB RAM, Ubuntu (version 14.04)
  • Ensure that OpenStack components Keystone, Glance, Nova, Neutron, Heat and Horizon are installed.
  • Git & Python packages should be installed

sudo apt-get install python-pip git

Steps:

  1. Create Client environment source file

export OS_PROJECT_DOMAIN_ID=default
export OS_USER_DOMAIN_ID=default
export OS_PROJECT_NAME=admin
export OS_TENANT_NAME=admin
export OS_USERNAME=admin
export OS_PASSWORD=ADMIN_PASS
export OS_AUTH_URL=http://controller:35357/v3
export OS_IDENTITY_API_VERSION=3


Ensure entry for extensions drivers in /etc/neutron/plugins/ml2/ml2_conf.ini Restart neutron services after the below entry has been added.[ml2] extension_drivers = port_security


Modify heat’s policy.json file under /etc/heat/policy.json file to allow users in non-admin projects with ‘admin’ roles to create flavors."resource_types:OS::Nova::Flavor": "role:admin"

Install Tacker server

Before you install and configure Tacker server, you must create a database, service credentials, and API endpoints.


  1. To create the database, complete these steps:
    • Use the database access client to connect to the database server as the root user:mysql -u root -p
    • Create the tacker database:create database tacker;
    • Grant proper access to the tacker database: GRANT ALL PRIVILEGES ON tacker.* TO 'tacker'@'localhost' \
      IDENTIFIED BY 'TACKER_DBPASS';
      GRANT ALL PRIVILEGES ON tacker.* TO 'tacker'@'%' \
      IDENTIFIED BY 'TACKER_DBPASS';
        Replace ‘TACKER_DBPASS’ with a suitable password.
    • Exit the database access client.
  2. Source the admin credentials to gain access to adminonly CLI commands:source admin-openrc.sh
  3. To create the service credentials, complete these steps:
    • Create the tacker user:
    • openstack user create --domain default --password <PASSWORD> tacker
    • Replace <PASSWORD> with a suitable password
    • Add the admin role to the tacker user:
    • openstack role add --project services --user tacker admin
      Note: Project_name can be service or services. Verify the project_name under [keystone_authtoken] section in the /etc/nova/nova.conf file.
    • Create the tacker service
    • openstack service create --name tacker --description "nfv-orchestration" servicevm
    • Create the tacker service API endpoints:
      • openstack endpoint create --region RegionOne <Service Type or Service ID> public http:// <TACKER_NODE_IP> :8888
        openstack endpoint create --region RegionOne <Service Type or Service ID> admin http:// <TACKER_NODE_IP> :8888
        openstack endpoint create --region RegionOne <Service Type or Service ID> internal http:// <TACKER_NODE_IP> :8888
  4. Clone tacker repositorygit clone -b stable/liberty https://github.com/openstack/tacker
  5. 5. Install all requirements. The requirements.txt file contains a set of python-packages required to run Tacker-Servercd tacker   sudo pip install -r requirements.txt 
    Note: If OpenStack components mentioned in pre-requisites section have been installed, the below command would be sufficient. cd tacker   sudo pip install tosca-parser
  6. Install tackersudo python setup.py install
  7. Create ‘tacker’ directory in ‘/var/log’
    Note:The above referenced path ‘/var/log’ is for Ubuntu and may be different for other Operating Systems.sudo mkdir /var/log/tacker
  8. Edit tacker.conf to ensure the below entries:
    Note:

      1. In Ubuntu 14.04, the tacker.conf is located at /usr/local/etc/tacker/ and below ini sample is for Ubuntu and directory paths referred in ini may be different for other Operating Systems.
      2. Project_name can be service or services. Verify the project_name in [keystone_authtoken] section in the /etc/nova/nova.conf file.

    [DEFAULT]
    auth_strategy = keystone
    policy_file = /usr/local/etc/tacker/policy.json
    debug = True
    use_syslog = False
    state_path = /var/lib/tacker
    ...
    [keystone_ authtoken]
    project_name = services
    password = <TACKER_SERVICE_USER_PASSWORD>
    auth_url = http://<KEYSTONE_IP>:35357
    identity_uri = http://<KEYSTONE_IP>:5000
    auth_uri = http://<KEYSTONE_IP>:5000   ...
    [agent]
    root_helper = sudo /usr/local/bin/tacker-rootwrap
    /usr/local/etc/tacker/rootwrap.conf
    ...
    [DATABASE]
    connection =
    mysql://tacker:<TACKERDB_PASSWORD>@<MYSQL_IP>:3306/tacker?charset=utf8
    ...
    [servicevm_nova]
    password = <NOVA_SERVICE_USER_PASSWORD>
    auth_url = http://<NOVA_IP>:35357
    ...
    [servicev m_heat]
    heat_uri = http://<HEAT_IP>:8004/v1

  9. Populate Tacker database:
    Note:The below command is for Ubuntu Operating System/usr/local/bin/tacker-db-manage --config-file /usr/local/etc/tacker/tacker.conf upgrade head

Install Tacker client

  1. Clone tacker-client repository.cd ~/
    git clone -b stable/liberty https://github.com/openstack/python-tackerclient
  2. Install tacker-client.cd python-tackerclient
    sudo python setup.py install

Install Tacker horizon

  1. Clone tacker-horizon repository.cd ~/
    git clone -b stable/liberty https://github.com/openstack/tacker-horizon
  2. Install horizon module.cd tacker-horizon
    sudo python setup.py install 
  3. Enable tacker horizon in dashboard.
    Note:The below destination path referred is for Ubuntu 14.04 and may change for other Operating Systems.sudo cp openstack_dashboard_extensions/* /usr/share/openstack-dashboard/openstack_dashboard/enabled/
  4. Restart Apache serversudo service apache2 restart

Starting Tacker server

Note:Ensure that ml2_conf.ini as per Step 4 from the pre-requisites section has been configured.
sudo python /usr/local/bin/tacker-server --config-file /usr/local/etc/tacker/tacker.conf --log-file /var/log/tacker/tacker.log &


Testing Tacker

Run the following tacker commands to verify whether tacker is working finetacker ext-list
tacker vnf-list
tacker device-list


A simple set of vnfd-create, vnf-create and vnf-update commands are shown below.

tacker vnfd-create –name ${VNFD_NAME} –vnfd-file ${VNFD_TOSCA_YAML-FILE}

tacker vnf-create –name vnf-name –vnfd-id ${VNFD_ID}

tacker vnf-update –config “${CONFIG_DATA_YAML} ${VNF_ID}

If command-line tacker works fine, try out Tacker using Horizon (NFV left menu entry)

Now Tacker is ready, start to play !!

Openstack -Delete Bulk Instances


Many of operation engineer look for solution how to delete instances in bulk from CLI or CURL call to reduce time effort, here is the filter method to do it, but please make sure that really you want to delete in bulk.


Here the best script method which i follows to do,

Source with required tenant, if you do as admin will delete all projects, so make sure of it.

Now run below CLI, which basically lists servers and grep its ID and do nova delete

nova list | awk '$2 && $2 != "ID" {print $2}' | xargs -n1 nova delete

In particular, the solution from dbxs uses the “name” field. If there are multiple instances with the same name, the “nova delete” operation will fali with:

Multiple server matches found for 'c0', use an ID to be more specific.
ERROR: Unable to delete any of the specified servers.

Gitlab – 502 Bad Gateway Error Troubleshooting

Lets do:

In a perfect world GitLab would now be running perfectly. Unfortunately, GitLab has surprisingly high memory requirements, so on 512MB VPSs it often chokes on the first sign in. This is because GitLab uses a lot of memory on the very first login. Since the Ubuntu 12.04 VPS has no swap space when the memory is exceeded parts of GitLab get terminated. Needless to say GitLab does not run well when parts of it are being unexpectedly terminated.

The easiest solution is just to allocate more memory to your VPS, at least for the first sign in. If you don’t want to do that, another option is to increase swap space. DigitalOcean already has a full tutorial on how to do this available here (although I would recommend adding more than just 512MB of swap). The quick fix is to run the following:

sudo dd if=/dev/zero of=/swapfile bs=1024 count=1024k
sudo mkswap /swapfile
sudo swapon /swapfile

Your swapfile is now running and active, but to set it so that it’s activated on each boot we need to edit/etc/fstab:

sudo nano /etc/fstab

Paste the following onto the bottom of the file:

/swapfile       none    swap    sw      0       0 

Now restart your VPS:

sudo restart

Wait a minute or two for your VPS to reboot, and then try GitLab again. If it doesn’t work the first time, refresh the Bad Gateway page a couple of times, and you should soon see the GitLab login page.

References:

  1. Check out the excellent Gitlab installation documentation here.
  2. And for info on the 502 bad gateway error, check this thread.

Openstack -Metering resource usage

red-business-graph


In Openstack, Telemetry service provides user-level usage data which can be used for customer billing, system monitoring, or alerts. Data can be collected by notifications sent by existing OpenStack components, Can view resource usage in dashboard as well as in CLI.

Resource Usage via Dashboard

  1. Log in to the dashboard and select the admin project from the drop-down list.
  2. On the Admin tab, click the Resource Usage category.
  3. Click the:
    • Usage Report tab to view a usage report per tenant (project) by specifying the time period (or even use a calendar to define a date range).
    • Stats tab to view a multi-series line chart with user-defined meters. You group by project, define the value type (min, max, avg, or sum), and specify the time period (or even use a calendar to define a date range).

Usage statistics via Nova

Though telemetry services are coming up, nova is doing needful greatly, with nova can retrieve host usage statistics instantly.

Host Usage statistics

  • List the hosts and the nova-related services that run on them:

    $ nova host-list
    +-----------+-------------+----------+
    | host_name | service     | zone     |
    +-----------+-------------+----------+
    | devstack  | conductor   | internal |
    | devstack  | compute     | nova     |
    | devstack  | cert        | internal |
    | devstack  | network     | internal |
    | devstack  | scheduler   | internal |
    | devstack  | consoleauth | internal |
    +-----------+-------------+----------+
    
  • Get a summary of resource usage of all of the instances running on the host:

    $ nova host-describe devstack
    +----------+----------------------------------+-----+-----------+---------+
    | HOST     | PROJECT                          | cpu | memory_mb | disk_gb |
    +----------+----------------------------------+-----+-----------+---------+
    | devstack | (total)                          | 2   | 4003      | 157     |
    | devstack | (used_now)                       | 3   | 5120      | 40      |
    | devstack | (used_max)                       | 3   | 4608      | 40      |
    | devstack | b70d90d65e464582b6b2161cf3603ced | 1   | 512       | 0       |
    | devstack | 66265572db174a7aa66eba661f58eb9e | 2   | 4096      | 40      |
    +----------+----------------------------------+-----+-----------+---------+
    

    The cpu column shows the sum of the virtual CPUs for instances running on the host.

    The memory_mb column shows the sum of the memory (in MB) allocated to the instances that run on the host.

    The disk_gb column shows the sum of the root and ephemeral disk sizes (in GB) of the instances that run on the host.

    The row that has the value used_now in the PROJECT column shows the sum of the resources allocated to the instances that run on the host, plus the resources allocated to the virtual machine of the host itself.

    The row that has the value used_max in the PROJECT column shows the sum of the resources allocated to the instances that run on the host.

Instance usage statistics

$ nova diagnostics ubuntu
+------------------+---------------+
| Property         | Value         |
+------------------+---------------+
| cpu0_time        | 1138410000000 |
| memory           | 524288        |
| memory-actual    | 524288        |
| memory-rss       | 591664        |
| vda_errors       | -1            |
| vda_read         | 334864384     |
| vda_read_req     | 13851         |
| vda_write        | 2985382912    |
| vda_write_req    | 177180        |
| vnet4_rx         | 45381339      |
| vnet4_rx_drop    | 0             |
| vnet4_rx_errors  | 0             |
| vnet4_rx_packets | 106426        |
| vnet4_tx         | 37513574      |
| vnet4_tx_drop    | 0             |
| vnet4_tx_errors  | 0             |
| vnet4_tx_packets | 162200        |
+------------------+---------------+

General usage per tenant:

$ nova usage-list
Usage from 2016-05-02 to 2016-06-30:
+----------------------------------+-----------+--------------+-----------+---------------+
| Tenant ID                        | Instances | RAM MB-Hours | CPU Hours | Disk GB-Hours |
+----------------------------------+-----------+--------------+-----------+---------------+
| 0eec5c34a7a24a7a8ddad27cb81d2706 | 8         | 240031.10    | 468.81    | 0.00          |
| 92a5d9c313424537b78ae3e42858fd4e | 5         | 483568.64    | 236.12    | 0.00          |
| f34d8f7170034280a42f6318d1a4af34 | 106       | 16888511.58  | 9182.88   | 0.00          |
+----------------------------------+-----------+--------------+-----------+---------------+

TryStack -Play around Openstack

Welcome, In this article we are going to see how to play with Trystack – The Easiest Way To Try Out OpenStack.

OpenStack is an open-source software cloud computing platform. OpenStack is primarily used for deploying an infrastructure as a service (IaaS) solution like Amazon Web Service (AWS). In other words, you can make your own AWS by using OpenStack. If you want to try out OpenStack, TryStack is the easiest and free way to do it.

1.png

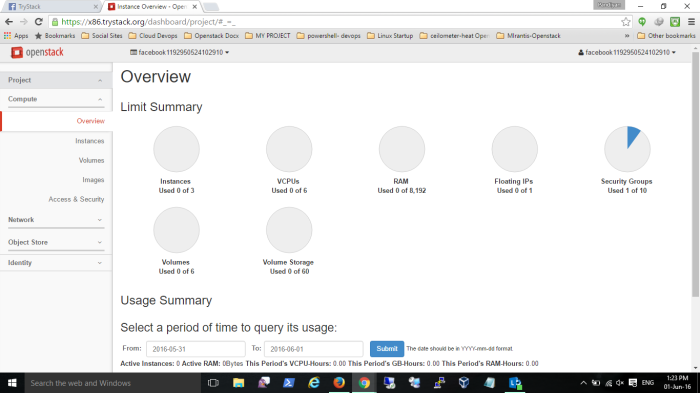
In order to try OpenStack in TryStack, you must register yourself by joining TryStack Facebook Group. The acceptance of group needs a couple days because it’s approved manually. After you have been accepted in the TryStack Group, you can log in TryStack.

1

Overview: What we will do?

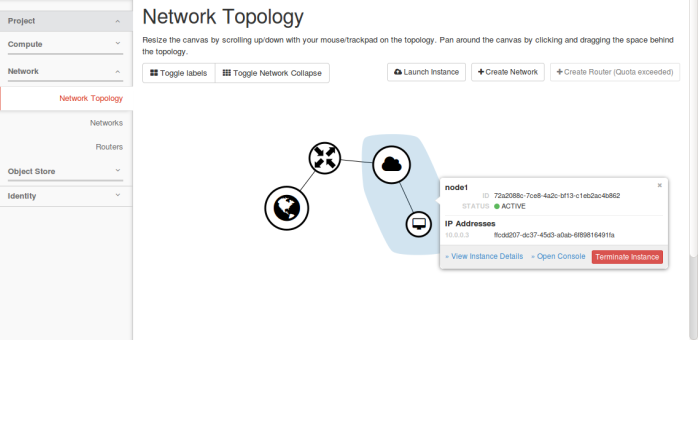
In this post, I will show you how to run an OpenStack instance. The instance will be accessible through the internet (have a public IP address). The final topology will like:

1.png

As you see from the image above, the instance will be connected to a local network and the local network will be connected to internet.


Step 1: Create Network

Network? Yes, the network in here is our own local network. So, your instances will be not mixed up with the others. You can imagine this as your own LAN (Local Area Network) in the cloud.

  1. Go to Network > Networks and then click Create Network.
  2. In Network tab, fill Network Name for example internal and then click Next.
  3. In Subnet tab,
    1. Fill Network Address with appropriate CIDR, for example 192.168.1.0/24. Useprivate network CIDR block as the best practice.
    2. Select IP Version with appropriate IP version, in this case IPv4.
    3. Click Next.
  4. In Subnet Details tab, fill DNS Name Servers with 8.8.8.8 (Google DNS) and then clickCreate.

Step 2: Create Instance

Now, we will create an instance. The instance is a virtual machine in the cloud, like AWS EC2. You need the instance to connect to the network that we just created in the previous step.

  1. Go to Compute > Instances and then click Launch Instance.
  2. In Details tab,
    1. Fill Instance Name, for example Ubuntu 1.
    2. Select Flavor, for example m1.medium.
    3. Fill Instance Count with 1.
    4. Select Instance Boot Source with Boot from Image.
    5. Select Image Name with Ubuntu 14.04 amd64 (243.7 MB) if you want install Ubuntu 14.04 in your virtual machine.
  3. In Access & Security tab,
    1. Click [+] button of Key Pair to import key pair. This key pair is a public and private key that we will use to connect to the instance from our machine.
    2. In Import Key Pair dialog,
      1. Fill Key Pair Name with your machine name (for example Edward-Key).
      2. Fill Public Key with your SSH public key (usually is in ~/.ssh/id_rsa.pub). See description in Import Key Pair dialog box for more information. If you are using Windows, you can use Puttygen to generate key pair.
      3. Click Import key pair.
    3. In Security Groups, mark/check default.
  4. In Networking tab,
    1. In Selected Networks, select network that have been created in Step 1, for exampleinternal.
  5. Click Launch.
  6. If you want to create multiple instances, you can repeat step 1-5. I created one more instance with instance name Ubuntu 2.

Step 3: Create Router

I guess you already know what router is. In the step 1, we created our network, but it is isolated. It doesn’t connect to the internet. To make our network has an internet connection, we need a router that running as the gateway to the internet.

  1. Go to Network > Routers and then click Create Router.
  2. Fill Router Name for example router1 and then click Create router.
  3. Click on your router name link, for example router1, Router Details page.
  4. Click Set Gateway button in upper right:
    1. Select External networks with external.
    2. Then OK.
  5. Click Add Interface button.
    1. Select Subnet with the network that you have been created in Step 1.
    2. Click Add interface.
  6. Go to Network > Network Topology. You will see the network topology. In the example, there are two network, i.e. external and internal, those are bridged by a router. There are instances those are joined to internal network.

Step 4: Configure Floating IP Address

Floating IP address is public IP address. It makes your instance is accessible from the internet. When you launch your instance, the instance will have a private network IP, but no public IP. In OpenStack, the public IPs is collected in a pool and managed by admin (in our case is TryStack). You need to request a public (floating) IP address to be assigned to your instance.

  1. Go to Compute > Instance.
  2. In one of your instances, click More > Associate Floating IP.
  3. In IP Address, click Plus [+].
  4. Select Pool to external and then click Allocate IP.
  5. Click Associate.
  6. Now you will get a public IP, e.g. 8.21.28.120, for your instance.

Step 5: Configure Access & Security

OpenStack has a feature like a firewall. It can whitelist/blacklist your in/out connection. It is called Security Group.

  1. Go to Compute > Access & Security and then open Security Groups tab.
  2. In default row, click Manage Rules.
  3. Click Add Rule, choose ALL ICMP rule to enable ping into your instance, and then clickAdd.
  4. Click Add Rule, choose HTTP rule to open HTTP port (port 80), and then click Add.
  5. Click Add Rule, choose SSH rule to open SSH port (port 22), and then click Add.
  6. You can open other ports by creating new rules.

Step 6: SSH to Your Instance

Now, you can SSH your instances to the floating IP address that you got in the step 4. If you are using Ubuntu image, the SSH user will be ubuntu.

That’s all, You can now do play around !! Enjoy !! Cheers !!