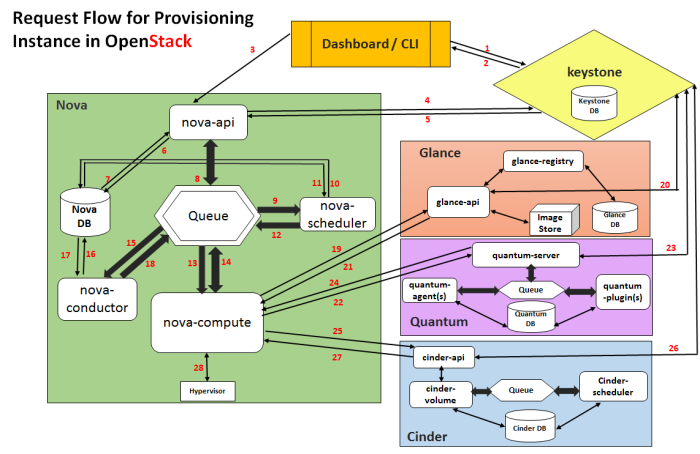
Openstack instance creation – request work flow

Here the request flow for provisioning an Instance  in openstack goes like this:

  1. Dashboard or CLI gets the user credential and does the REST call to Keystone for authentication.
  2. Keystone authenticate the credentials and generate & send back auth-token which will be used for sending request to other Components through REST-call.
  3. Dashboard or CLI convert the new instance request specified in  ‘launch instance’ or ‘nova-boot’ form to REST API request and send it to nova-api.
  4. nova-api receive the request and sends the request for validation auth-token and access permission tokeystone.
  5. Keystone validates the token and sends updated auth headers with roles and permissions.
  6. nova-api interacts with nova-database.
  7. Creates initial db entry for new instance.
  8.  nova-api sends the rpc.call request to nova-scheduler excepting to get  updated instance entry with host ID specified.
  9. nova-scheduler picks the request from the queue.
  10. nova-scheduler interacts with nova-database to find an appropriate host via filtering and weighing.
  11. Returns the updated instance entry with appropriate host ID after filtering and weighing.
  12. nova-scheduler sends the rpc.cast request to nova-compute for ‘launching instance’ on appropriate host .
  13. nova-compute picks the request from the queue.
  14. nova-compute send the rpc.call request to nova-conductor to fetch the instance information such as host ID and flavor( Ram , CPU ,Disk).
  15. nova-conductor picks the request from the queue.
  16. nova-conductor interacts with nova-database.
  17. Return the instance information.
  18. nova-compute picks the instance information from the queue.
  19. nova-compute does the REST call by passing auth-token to glance-api  to get the Image URI by Image ID from glance and upload image from image storage.
  20. glance-api validates the auth-token with keystone.
  21. nova-compute get the image metadata.
  22. nova-compute does the REST-call by passing auth-token to Network API to allocate and configure the network such that instance gets the IP address.
  23. quantum-server validates the auth-token with keystone.
  24. nova-compute get the network info.
  25. nova-compute does the REST call by passing auth-token to Volume API to attach volumes to instance.
  26. cinder-api validates the auth-token with keystone.
  27. nova-compute gets the block storage info.
  28. nova-compute generates data for hypervisor driver and executes request on Hypervisor( via libvirt or api).

Below Diagram states the same

1.png

NFS File System

Network File System (NFS) is a way to share files between machines on a network as if the files were located on the client’s local hard drive. it can export file systems to other systems and mount file systems exported from other machines.

Why Use NFS?

NFS is useful for sharing directories of files between multiple users on the same network. For example, a group of users working on the same project can have access to the files for that project using a shared directory of the NFS file system

Pro’s of NFS

  1. NFS allows local access to remote files.
  2. It uses standard client/server architecture for file sharing between all *nix based machines.
  3. With NFS it is not necessary that both machines run on the same OS.
  4. With the help of NFS we can configure centralized storage solutions.
  5. Users get their data irrespective of physical location.
  6. No manual refresh needed for new files.
  7. Newer version of NFS also supports aclpseudo maestro mounts.
  8. Can be secured with Firewalls and Kerberos.

NFS Services

Its a System V-launched service. The NFS server package includes three facilities, included in the portmap andnfs-utils packages.

  1. portmap : It maps calls made from other machines to the correct RPC service (not required with NFSv4).
  2. nfs: It translates remote file sharing requests into requests on the local file system.
  3. rpc.mountd: This service is responsible for mounting and unmounting of file systems.

Important Files for NFS Configuration

  1. /etc/exports : Its a main configuration file of NFS, all exported files and directories are defined in this file at the NFS Server end.
  2. /etc/fstab : To mount a NFS directory on your system across the reboots, we need to make an entry in/etc/fstab.
  3. /etc/sysconfig/nfs : Configuration file of NFS to control on which port rpc and other services are listening.

Setup and Configure NFS Mounts

To setup NFS mounts, we’ll be needing at least two Linux/Unix machines. Here in this tutorial, I’ll be using two servers.

  1. NFS Server: nfsserver.example.com with IP-192.168.0.100
  2. NFS Client : nfsclient.example.com with IP-192.168.0.101

Installing NFS Server and NFS Client

We need to install NFS packages on our NFS Server as well as on NFS Client machine. We can install it via “yum” (Red Hat Linux) and “apt-get” (Debian and Ubuntu) package installers.

[maestro@nfsserver ~]# yum install nfs-utils nfs-utils-lib

[maestro@nfsserver ~]# yum install portmap (not required with NFSv4)

[maestro@nfsserver ~]# apt-get install nfs-utils nfs-utils-lib

Now start the services on both machines.

[maestro@nfsserver ~]# /etc/init.d/portmap start

[maestro@nfsserver ~]# /etc/init.d/nfs start

[maestro@nfsserver ~]# chkconfig –level 35 portmap on

[maestro@nfsserver ~]# chkconfig –level 35 nfs on

After installing packages and starting services on both the machines, we need to configure both the machines for file sharing.

Setting Up the NFS Server

First we will be configuring the NFS server.

Configure Export directory

For sharing a directory with NFS, we need to make an entry in “/etc/exports” configuration file. Here I’ll be creating a new directory named “nfsshare” in “/” partition to share with client server, you can also share an already existing directory with NFS.

[maestro@nfsserver ~]# mkdir /nfsshare

Now we need to make an entry in “/etc/exports” and restart the services to make our directory shareable in the network.

[maestro@nfsserver ~]# vi /etc/exports


/nfsshare 192.168.0.101(rw,sync,no_maestro_squash)

In the above example, there is a directory in / partition named “nfsshare” is being shared with client IP “192.168.0.101” with read and write (rw) privilege, you can also use hostname of the client in the place of IP in above example.

NFS Options

Some other options we can use in “/etc/exports” file for file sharing is as follows.

  1. ro: With the help of this option we can provide read only access to the shared files i.e client will only be able to read.
  2. rw: This option allows the client server to both read and write access within the shared directory.
  3. sync: Sync confirms requests to the shared directory only once the changes have been committed.
  4. no_subtree_check: This option prevents the subtree checking. When a shared directory is the subdirectory of a larger file system, nfs performs scans of every directory above it, in order to verify its permissions and details. Disabling the subtree check may increase the reliability of NFS, but reduce security.
  5. no_maestro_squash: This phrase allows maestro to connect to the designated directory.

For more options with “/etc/exports“, you are recommended to read the man pages for export.

Mount Shared Directories on NFS Client

Now at the NFS client end, we need to mount that directory in our server to access it locally. To do so, first we need to find out that shares available on the remote server or NFS Server.

[maestro@nfsclient ~]# showmount -e 192.168.0.100


Export list for 192.168.0.100:

/nfsshare 192.168.0.101

Above command shows that a directory named “nfsshare” is available at “192.168.0.100” to share with your server.

Mount Shared NFS Directory

To mount that shared NFS directory we can use following mount command.

[maestro@nfsclient ~]# mount -t nfs 192.168.0.100:/nfsshare /mnt/nfsshare

The above command will mount that shared directory in “/mnt/nfsshare” on the client server. You can verify it following command.

[maestro@nfsclient ~]# mount | grep nfs


sunrpc on /var/lib/nfs/rpc_pipefs type rpc_pipefs (rw)

nfsd on /proc/fs/nfsd type nfsd (rw)

192.168.0.100:/nfsshare on /mnt type nfs (rw,addr=192.168.0.100)

The above mount command mounted the nfs shared directory on to nfs client temporarily, to mount an NFS directory permanently on your system across the reboots, we need to make an entry in “/etc/fstab“.

[maestro@nfsclient ~]# vi /etc/fstab

Add the following new line as shown below.

192.168.0.100:/nfsshare /mnt  nfs defaults 0 0

Test the Working of NFS Setup

We can test our NFS server setup by creating a test file on the server end and check its availability at nfs clientside or vice-versa.

At the nfsserver end

I have created a new text file named “nfstest.txt’ in that shared directory.

[maestro@nfsserver ~]# cat > /nfsshare/nfstest.txt


This is a test file to test the working of NFS server setup.

At the nfsclient end

Go to that shared directory in client server and you’ll find that shared file without any manual refresh or service restart.

[maestro@nfsclient]# ll /mnt/nfsshare

total 4

-rw-r–r– 1 maestro maestro 61 Sep 21 21:44 nfstest.txt

maestro@nfsclient ~]# cat /mnt/nfsshare/nfstest.txt

This is a test file to test the working of NFS server setup.

Removing the NFS Mount

If you want to unmount that shared directory from your server after you are done with the file sharing, you can simply unmount that particular directory with “umount” command. See this example below.

maestro@nfsclient ~]# umount /mnt/nfsshare

You can see that the mounts were removed by then looking at the filesystem again.

[maestro@nfsclient ~]# df -h -F nfs

You’ll see that those shared directories are not available any more.

In additon : Important commands for NFS

Some more important commands for NFS.

  1. showmount -e : Shows the available shares on your local machine
  2. showmount -e <server-ip or hostname>: Lists the available shares at the remote server
  3. showmount -d : Lists all the sub directories
  4. exportfs -v : Displays a list of shares files and options on a server
  5. exportfs -a : Exports all shares listed in /etc/exports, or given name
  6. exportfs -u : Unexports all shares listed in /etc/exports, or given name
  7. exportfs -r : Refresh the server’s list after modifying /etc/exports

This is NFS mount for now, this is just start, will post more option and feature in future.


Please provide feedback !!

Live resizing – Linux Ext4 filesytem

Hi All,

In this article going to see live resizng of Ext File system. It involves two major steps

  1. Increase partition size
  2. resizing file system (Enlarging)

1) Increase the partition size

You can use fdisk to change your partition table while running. Here I has created 3 partitions: one primary (sda1), one extended (sda2) with a single logical partition (sda5) in it.

The extended partition is simply used for swap, so I could easily move it without losing any data.

  1. Delete the primary partition
  2. Delete the extended partition
  3. Create a new primary partition starting at the same sector as the original one just with a bigger size (leave some for swap)
  4. Create a new extended partition with a logical partition in it to hold the swap space
maestro@ubuntu:~$ sudo fdisk /dev/sda
Command (m for help): p
Disk /dev/sda: 268.4 GB, 268435456000 bytes
255 heads, 63 sectors/track, 32635 cylinders, total 524288000 sectors
Units = sectors of 1 * 512 = 512 bytes
Sector size (logical/physical): 512 bytes / 512 bytes
I/O size (minimum/optimal): 512 bytes / 512 bytes
Disk identifier: 0x000e49fa
   Device Boot      Start         End      Blocks   Id  System
/dev/sda1   *        2048   192940031    96468992   83  Linux
/dev/sda2       192942078   209713151     8385537    5  Extended
/dev/sda5       192942080   209713151     8385536   82  Linux swap / Solaris
Command (m for help): d
Partition number (1-5): 1
Command (m for help): d
Partition number (1-5): 2
Command (m for help): n
Partition type:
   p   primary (0 primary, 0 extended, 4 free)
   e   extended
Select (default p): p
Partition number (1-4, default 1):
Using default value 1
First sector (2048-524287999, default 2048):
Using default value 2048
Last sector, +sectors or +size{K,M,G} (2048-524287999, default 524287999): 507516925
Command (m for help): p
Disk /dev/sda: 268.4 GB, 268435456000 bytes
255 heads, 63 sectors/track, 32635 cylinders, total 524288000 sectors
Units = sectors of 1 * 512 = 512 bytes
Sector size (logical/physical): 512 bytes / 512 bytes
I/O size (minimum/optimal): 512 bytes / 512 bytes
Disk identifier: 0x000e49fa
   Device Boot      Start         End      Blocks   Id  System
/dev/sda1            2048   507516925   253757439   83  Linux
Command (m for help): n
Partition type:
   p   primary (1 primary, 0 extended, 3 free)
   e   extended
Select (default p): e
Partition number (1-4, default 2): 2
First sector (507516926-524287999, default 507516926):
Using default value 507516926
Last sector, +sectors or +size{K,M,G} (507516926-524287999, default 524287999):
Using default value 524287999
Command (m for help): p
Disk /dev/sda: 268.4 GB, 268435456000 bytes
255 heads, 63 sectors/track, 32635 cylinders, total 524288000 sectors
Units = sectors of 1 * 512 = 512 bytes
Sector size (logical/physical): 512 bytes / 512 bytes
I/O size (minimum/optimal): 512 bytes / 512 bytes
Disk identifier: 0x000e49fa
   Device Boot      Start         End      Blocks   Id  System
/dev/sda1            2048   507516925   253757439   83  Linux
/dev/sda2       507516926   524287999     8385537    5  Extended
Command (m for help): n
Partition type:
   p   primary (1 primary, 1 extended, 2 free)
   l   logical (numbered from 5)
Select (default p): l
Adding logical partition 5
First sector (507518974-524287999, default 507518974):
Using default value 507518974
Last sector, +sectors or +size{K,M,G} (507518974-524287999, default 524287999):
Using default value 524287999
Command (m for help): p
Disk /dev/sda: 268.4 GB, 268435456000 bytes
255 heads, 63 sectors/track, 32635 cylinders, total 524288000 sectors
Units = sectors of 1 * 512 = 512 bytes
Sector size (logical/physical): 512 bytes / 512 bytes
I/O size (minimum/optimal): 512 bytes / 512 bytes
Disk identifier: 0x000e49fa
   Device Boot      Start         End      Blocks   Id  System
/dev/sda1            2048   507516925   253757439   83  Linux
/dev/sda2       507516926   524287999     8385537    5  Extended
/dev/sda5       507518974   524287999     8384513   83  Linux
Command (m for help): t
Partition number (1-5): 5
Hex code (type L to list codes): 82
Changed system type of partition 5 to 82 (Linux swap / Solaris)
Command (m for help): p
Disk /dev/sda: 268.4 GB, 268435456000 bytes
255 heads, 63 sectors/track, 32635 cylinders, total 524288000 sectors
Units = sectors of 1 * 512 = 512 bytes
Sector size (logical/physical): 512 bytes / 512 bytes
I/O size (minimum/optimal): 512 bytes / 512 bytes
Disk identifier: 0x000e49fa
   Device Boot      Start         End      Blocks   Id  System
/dev/sda1            2048   507516925   253757439   83  Linux
/dev/sda2       507516926   524287999     8385537    5  Extended
/dev/sda5       507518974   524287999     8384513   82  Linux swap / Solaris
Command (m for help): w
The partition table has been altered!
Calling ioctl() to re-read partition table.
WARNING: Re-reading the partition table failed with error 16: Device or resource busy.
The kernel still uses the old table. The new table will be used at
the next reboot or after you run partprobe(8) or kpartx(8)
Syncing disks.
maestro@ubuntu:~$ sudo reboot

2) Enlarge  the file system

You can do this with resize2fs online on a mounted partition.


maestro@ubuntu:~$ df -h
Filesystem      Size  Used Avail Use% Mounted on
/dev/sda1        91G   86G   12M 100% /
udev            3.9G  4.0K  3.9G   1% /dev
tmpfs           1.6G  696K  1.6G   1% /run
none            5.0M     0  5.0M   0% /run/lock
none            3.9G  144K  3.9G   1% /run/shm
none            100M   16K  100M   1% /run/user
maestro@ubuntu:~$ sudo resize2fs /dev/sda1
resize2fs 1.42.5 (29-Jul-2012)
Filesystem at /dev/sda1 is mounted on /; on-line resizing required
old_desc_blocks = 6, new_desc_blocks = 16
The filesystem on /dev/sda1 is now 63439359 blocks long.
maestro@ubuntu:~$ df -h
Filesystem      Size  Used Avail Use% Mounted on
/dev/sda1       239G   86G  142G  38% /
udev            3.9G   12K  3.9G   1% /dev
tmpfs           1.6G  696K  1.6G   1% /run
none            5.0M     0  5.0M   0% /run/lock
none            3.9G  152K  3.9G   1% /run/shm
none            100M   36K  100M   1% /run/user

Slight catch: After rebooting the swap space wasn’t active. Turned out you need to run mkswap, adjust /etc/fstab to the new UUID and turn the swap on


maestro@ubuntu:~$ sudo mkswap /dev/sda5
Setting up swapspace version 1, size = 8384508 KiB
no label, UUID=141d401a-b49d-4a96-9b85-c130cb0de40a
maestro@ubuntu:~$ sudo swapon --all --verbose
swapon on /dev/sda5
swapon: /dev/sda5: found swap signature: version 1, page-size 4, same byte  order
swapon: /dev/sda5: pagesize=4096, swapsize=8585740288, devsize=8585741312
Edit /etc/fstab to replace the UUID for the old swap partition with the new one from mkswap.
Now successfully lively resized file system.
Feedback is appreciated !!

Backup & Restore Ext 2/3/4 File Systems

Hi All,

In this article we are going to see how to back and restore Ext 2/3/4 File systems.

All data must be backed up before attempting any kind of restore operation. Data backups should be made on a regular basis. In addition to data, there is configuration information that should be saved, including /etc/fstab and the output of fd i sk -l . Running an sosreport/sysreport will capture this information and is strongly recommended.

# cat /etc/fstab
LABEL=/ / ext3 defaults 1 1
LABEL=/boot1 /boot ext3 defaults 1 2

LABEL=/data /data ext3 defaults 0 0
tmpfs /dev/shm tmpfs defaults 0 0
devpts /dev/pts devpts gid=5,mode=620 0 0
sysfs /sys sysfs defaults 0 0
proc /proc proc defaults 0 0
LABEL=SWAP-sda5 swap swap defaults 0 0
/dev/sda6 /backup-files ext3 defaults 0 0
# fdisk -l
Device Boot Start End Blocks Id System
/dev/sda1 * 1 13 104391 83 Linux
/dev/sda2 14 1925 15358140 83 Linux
/dev/sda3 1926 3200 10241437+ 83 Linux
/dev/sda4 3201 4864 13366080 5 Extended
/dev/sda5 3201 3391 1534176 82 Linux swap /
Solaris
/dev/sda6 3392 4864 11831841 83 Linux

In this example, we will use the /d ev/sd a6 partition to save backup files, and we assume
that /d ev/sd a6 is mounted on /backup-fi l es.
2. If the partition being backed up is an operating system partition, bootup your system into
Single User Mode. This step is not necessary for normal data partitions.
3. Use “dump” to backup the contents of the partitions:

# dump -0uf /backup-files/sda1.dump /dev/sda1
# dump -0uf /backup-files/sda2.dump /dev/sda2
# dump -0uf /backup-files/sda3.dump /dev/sda3

If you want to do a remote backup, you can use both ssh or configure a non-password login.


# dump -0u -f – /dev/sda1 | ssh root@ remoteserver.example.com dd
of=/tmp/sda1.dump


 Restoration:

Procedures :

1. If you are restoring an operating system partition, bootup your system into Rescue Mode.
This step is not required for ordinary data partitions.
2. Rebuild sda1/sda2/sda3/sda4/sda5 by using the fd isk command.

3. Format the destination partitions by using the mkfs command, as shown below.


# mkfs.ext3 /dev/sda1
# mkfs.ext3 /dev/sda2
# mkfs.ext3 /dev/sda3

4. If creating new partitions, re-label all the partitions so they match the fstab file. This step is
not required if the partitions are not being recreated.

# e2label /dev/sda1 /boot1
# e2label /dev/sda2 /
# e2label /dev/sda3 /data
# mkswap -L SWAP-sda5 /dev/sda5

5. Prepare the working directories.

# mkdir /mnt/sda1
# mount -t ext3 /dev/sda1 /mnt/sda1
# mkdir /mnt/sda2
# mount -t ext3 /dev/sda2 /mnt/sda2
# mkdir /mnt/sda3
# mount -t ext3 /dev/sda3 /mnt/sda3
# mkdir /backup-files
# mount -t ext3 /dev/sda6 /backup-files

6. Restore the data.

# cd /mnt/sda1
# restore -rf /backup-files/sda1.dump
# cd /mnt/sda2
# restore -rf /backup-files/sda2.dump
# cd /mnt/sda3
# restore -rf /backup-files/sda3.dump

If you want to restore from a remote host or restore from a backup file on a remote host you can use either ssh or rsh. You will need to configure a password-less login for the following examples:
Login into 10.0.0.87, and restore sda1 from local sda1.dump file:

# ssh 10.0.0.87 “cd /mnt/sda1 & & cat /backup-files/sda1.dump |
restore -rf -“

Login into 10.0.0.87, and restore sda1 from a remote 10.66.0.124 sda1.dump file:

# ssh 10.0.0.87 “cd /mnt/sda1 & & RSH=/usr/bin/ssh restore -r -f
10.66.0.124:/tmp/sda1.dump”

7. Reboot.⁠


Linux File System – Backup & restore

Hi All,

In this article we are going to see, how to back up and restore linux file system, there are some ways like tar, cron job.

Most of you have probably used Windows before you started using Ubuntu. During that time you might have needed to backup and restore your system. For Windows you would need proprietary software for which you would have to reboot your machine and boot into a special environment in which you could perform the backing-up/restoring (programs like Norton Ghost).
During that time you might have wondered why it wasn’t possible to just add the whole c:\ to a big zip-file. This is impossible because in Windows, there are lots of files you can’t copy or overwrite while they are being used, and therefore you needed specialized software to handle this.

Well, I’m here to tell you that those things, just like rebooting, are Windows CrazyThings ™. There’s no need to use programs like Ghost to create backups of your Ubuntu system (or any Linux system, for that matter). In fact; using Ghost might be a very bad idea if you are using anything but ext2. Ext3, the default Ubuntu partition, is seen by Ghost as a damaged ext2 partition and does a very good job at screwing up your data.

1: Backing-up

“What should I use to backup my system then?” might you ask. Easy; the same thing you use to backup/compress everything else; TAR. Unlike Windows, Linux doesn’t restrict root access to anything, so you can just throw every single file on a partition in a TAR file!

To do this, become root with

Code:
sudo su

and go to the root of your filesystem (we use this in our example, but you can go anywhere you want your backup to end up, including remote or removable drives.)

Code:
cd /

Now, below is the full command I would use to make a backup of my system:

Code:
tar cvpzf backup.tgz --exclude=/proc --exclude=/lost+found --exclude=/backup.tgz --exclude=/mnt --exclude=/sys /

Now, lets explain this a little bit.
The ‘tar’ part is, obviously, the program we’re going to use.

‘cvpfz’ are the options we give to tar, like ‘create archive’ (obviously),
‘preserve permissions'(to keep the same permissions on everything the same), and ‘gzip’ to keep the size down.

Next, the name the archive is going to get. backup.tgz in our example.

Next comes the root of the directory we want to backup. Since we want to backup everything; /

Now come the directories we want to exclude. We don’t want to backup everything since some dirs aren’t very useful to include. Also make sure you don’t include the file itself, or else you’ll get weird results.
You might also not want to include the /mnt folder if you have other partitions mounted there or you’ll end up backing those up too. Also make sure you don’t have anything mounted in /media (i.e. don’t have any cd’s or removable media mounted). Either that or exclude /media.

Note :  kvidell suggests below we also exclude the /dev directory. I have other evidence that says it is very unwise to do so though.

Well, if the command agrees with you, hit enter (or return, whatever) and sit back&relax. This might take a while.

Afterwards you’ll have a file called backup.tgz in the root of your filessytem, which is probably pretty large. Now you can burn it to DVD or move it to another machine, whatever you like!

Note :
At the end of the process you might get a message along the lines of ‘tar: Error exit delayed from previous errors’ or something, but in most cases you can just ignore that.

Alternatively, you can use Bzip2 to compress your backup. This means higher compression but lower speed. If compression is important to you, just substitute
the ‘z’ in the command with ‘j’, and give the backup the right extension.
That would make the command look like this:

Code:
tar cvpjf backup.tar.bz2 --exclude=/proc --exclude=/lost+found --exclude=/backup.tar.bz2 --exclude=/mnt --exclude=/sys /

2: Restoring

Warning: Please, for goodness sake, be careful here. If you don’t understand what you are doing here you might end up overwriting stuff that is important to you, so please take care!

Well, we’ll just continue with our example from the previous chapter; the file backup.tgz in the root of the partition.

Once again, make sure you are root and that you and the backup file are in the root of the filesystem.

One of the beautiful things of Linux is that This’ll work even on a running system; no need to screw around with boot-cd’s or anything. Of course, if you’ve rendered your system unbootable you might have no choice but to use a live-cd, but the results are the same. You can even remove every single file of a Linux system while it is running with one command. I’m not giving you that command though!

Well, back on-topic.
This is the command that I would use:

Code:
 tar xvpfz backup.tgz -C /

Or if you used bz2;

Code:
 tar xvpfj backup.tar.bz2 -C /

WARNING: this will overwrite every single file on your partition with the one in the archive!

Just hit enter/return/your brother/whatever and watch the fireworks. Again, this might take a while. When it is done, you have a fully restored Ubuntu system! Just make sure that, before you do anything else, you re-create the directories you excluded:

Code:
mkdir proc
mkdir lost+found
mkdir mnt
mkdir sys
etc...

And when you reboot, everything should be the way it was when you made the backup!


Advanced with GRUB restore as below

GRUB restore
Now, if you want to move your system to a new harddisk or if you did something nasty to your GRUB (like, say, install Windows), You’ll also need to reinstall GRUB.
There are several very good howto’s on how to do that here on this forum, so i’m not going to reinvent the wheel. Instead, take a look here:

http://www.ubuntuforums.org/showthre…t=grub+restore

There are a couple of methods proposed. I personally recommend the second one, posted by remmelt, since that has always worked for me.


Hope it was helpful for all, Feedback is appreciated !!

Setup Remote System Logging with rsyslog on Linux

The rsyslogtool takes care of receiving all the log message from the kernel and operating system applications and distributing them over files in /var/log.

However, rsyslog can do much more than that which includes logging into a remote server. This can be extremely useful for aggregating logs across a large fleet of servers or when it is not possible to write logs on disk.

In this tutorial, we’re going to install rsyslog on a remote machine so we can ship logs to, redirect all logging to that remote server.

Installing rsyslog on Remote Server

You will need a copy of rsyslog running on a remote machine which will be recieving the logs from your existing server. It’s best that you have this in a remote location. The reason being that if this server crashes at the same time as your server crashes, you won’t be able to get any logs to troubleshoot any issues.

Assuming that you’re using Ubuntu on the remote machine, you’ll already be running rsyslog. If not, you can install it by following the instructions provided inside the rsyslog website.

Once it’s installed, you will need to make sure that it listens on a port which we will send logs to. The default port is 514 which we’ll keep. You will need to edit the file /etc/rsyslog.conf

Local Storage Log Path

/var/syslog/hosts/Host Machine Name/ Year/Month/

Rsyslog Server Configuration file:

/etc/rsyslog.conf

$ModLoad imtcp

$ModLoad imudp

$ModLoad imuxsock

$ModLoad imklog

# Templates

# log every host in its own directory

$template RemoteHost,”/var/syslog/hosts/%HOSTNAME%/%$YEAR%/%$MONTH%/%$DAY%/syslog.log”

### Rulesets

# Local Logging

$RuleSet local

kern.*                                                 /var/log/messages

*.info;mail.none;authpriv.none;cron.none                /var/log/messages

authpriv.*                                              /var/log/secure

mail.*                                                  -/var/log/maillog

cron.*                                                  /var/log/cron

*.emerg                                                 *

uucp,news.crit                                          /var/log/spooler

local7.*                                                /var/log/boot.log

# use the local RuleSet as default if not specified otherwise

$DefaultRuleset local


# Remote Logging

$RuleSet remote

*.* ?RemoteHost

# Send messages we receive to Gremlin

#*.* @@remote.server:514

#*.* @@rjilsiem.jio.com:514


#*.* @@remote.server2:514

*.* @@remote.server:514


### Listeners

# bind ruleset to tcp listener

$InputTCPServerBindRuleset remote

# and activate it:

$InputTCPServerRun 10514


$InputUDPServerBindRuleset remote

$UDPServerRun 514

 Log Source Configuration:

 Configuration file: /etc/rsyslog.conf

 $ModLoad imuxsock # provides support for local system logging

$ModLoad imklog   # provides kernel logging support

#$ActionFileDefaultTemplate RSYSLOG_TraditionalFileFormat

 $template MyTemplate, “<%pri%> %timestamp% zabbix.10.135.63.208 %syslogtag% %msg%\n”    ### these two lines will add zabbix.10.135.63.208 in fwded lines to easily identify source servers

$ActionForwardDefaultTemplate MyTemplate


$RepeatedMsgReduction on

$FileOwner syslog

$FileGroup adm

$FileCreateMode 0640

$DirCreateMode 0755

$Umask 0022

$PrivDropToUser syslog

$PrivDropToGroup syslog

$WorkDirectory /var/spool/rsyslog

$IncludeConfig /etc/rsyslog.d/*.conf

*.* @remoteserver:514


Troubleshooting Step:

  • Check rsyslogd service running
  • Port 514 UDP is open
  • Rsyslog server able to communicate with remote.server port 514

Thanks 🙂

Rsyslog Windows Agent Configuration


This section contains some basic or advanced configuration samples for the Rsyslog Windows Agent. They show some basic configurations as well as complex scenarios in conjunction with rsyslog for Linux.

  Using RSyslog Windows Agent to forward log files

  Forward Windows Eventlogs with RSyslog Windows Agent

  How To setup File Monitor Service

  How To setup the Forward via Syslog Action


Forward Windows Eventlogs with RSyslog Windows Agent

Step 1: Setting up the rule set and action.

  1. First we define a new rule set. Right-click “Rules”. A pop up menu will appear. Select “Add Rule Set” from this menu.
  2. Then, a wizard starts. Change the name of the rule to whatever name you like. We will use “Forward syslog” in this example. Click “Next” to go on with the next step.
  3. Select only Forward via Syslog. Do not select any other options for this sample. Also, leave the “Create a Rule for each of the following actions” setting selected. Click “Next”. You will see a confirmation page. Click “Finish” to create the rule set.
  4. As you can see, the new Rule Set “Forward syslog” is present. Please expand it in the tree view until the action level of the “Forward syslog” Rule and select the “Forward syslog” action to configure.
  5. Configure the “Forward via Syslog” Action
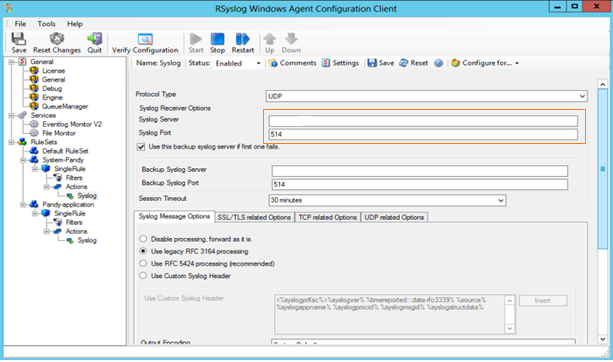
    Type the “IP or the Hostname” of your syslog server into the Syslog Server field in the form.

11.png

Note : Enter your syslog server IP in blank

  1. Finally, make sure you press the “Save” button – otherwise your changes will not be applied. Then start the service and you are done.

Step 2 : Setting up the service

Now we will set up the service. There is one thing to mention first. You need to know choose one of the latter links according to your operating system. This is important, or the setup might not work properly. We have 2 different versions of the EventLog Monitor. Here is a small list in which you can see, which service fits which operating systems.

  1. EventLog Monitor: 2000, XP, 2003
  2. EventLog Monitor V2: Vista, 2008, 7, Windows server 2008,2012 r2

it is advised to used the optimized EventLog Monitor V2. This is due to the massive changes that Microsoft introduced to the EventLog system.

How To setup EventLogMonitor V2 Service

  1. First, right click on “Services”, then select “Add Service” and then “Event Log Monitor V2″

Again, you can use either the default name or any one you like. We will use the default name in this sample. Leave the “Use default settings” selected and press “Next”.

  1. As we have used the default, the wizard will immediately proceed with step 3, the confirmation page. Press “Finish” to create the service. The wizard completes and returns to the configuration client.
  2. Now, you will see the newly created service beneath the “Services” as part of the tree view. To check its parameters, select it

Note: The “Default RuleSet” has been automatically assigned as the rule set to use. By default, the wizard will always assign the first rule set visible in the tree view to new services.

  1. Finally we, bind a rule set to this service. If you already have a rule set, simply choose one. If not, then you will have to create one, or insert the actions you want to take in the default rule set.

The last step is to save the changes and start the service. This procedure completes the configuration of the syslog server.
The NT Service cannot dynamically read changed configurations. As such, it needs to be restarted after such changes. In our sample, the service was not yet started, so we simply need to start it. If it already runs, you need to restart it.

That’s it. This is how you create a simple Event Log Monitor V2 for Vista.

Using RSyslog Windows Agent to forward log files

Step 1: Setting up the ruleset and action.

 As previous create new rule “Pandy-Log File”
Step 2: Setting up the service.
  1. First, right click on “Services”, then select “Add Service” and the “File Monitor”.

Now, you will see the newly created service beneath the “Services” part of the tree view. To check its parameters, select it

Now the Log Files are monitored successfully.

Note:  For all kind of Configuration Give the Tag Value as <HOSTNAME> < IP ADDRESS> <LABEL>, which helps to trace the logs.Example for monitoring MSSQL Monitoring :

PANDY            <HostIP >       MSSQL.LOG. 

Hope the Docx helps to do Log/Event/File Forwarding to Syslog Server for SIEM Integration.

Git – Overview

Git

Git is a free and open source distributed version control system designed to handle everything from small to very large projects with speed and efficiency.

Git is easy to learn and has a tiny footprint with lightning fast performance. It outclasses SCM tools like Subversion, CVS, Perforce, and ClearCase with features like cheap local branching, convenientstaging areas, and multiple workflows.

Git is the corner piece of development. This article is my git memo.

installation

apt-get install git

configuration

Anything can be set at three levels
config targets saves to scope
--system /etc/gitconfig host
--global ~/.gitconfig user
--local .git/config repository

Minimum configuration:

% git config --global user.name "your name"
% git config --global user.email "your email"
% git config --global core.editor "vim"

Querying all entries :

% git config --list

Querying one entry

% git config section.key
% git config section.subsection.key
% git config remote.origin.url

Where you have in your config file

[remote "origin"]
        url = https://github.com/planetrobbie/www.yet.org.git

export https_proxy=http://proxyhost:proxyport to setup your proxy git config --global http.proxy http://user:pass@proxyhost:proxyport another way to setup your proxy

create a new repo

First create some required files: Readme.md, LICENSE and .gitignore.
You can then initialize your repository by creating .git directory using the following command

% git init

You can add a directory name to ask git to create it at the same time.

1st commit

% git add README.md LICENSE .gitignore

If you prefer you can add all of your modified files like this

% git add -A

check status, commit locally

% git status -s
% git commit -m "initial commit"

create a new repo on GitHub and push it there

% git remote add origin https://github.com/USERNAME/REPONAME.git
% git push -u origin master

following up commits

% git add FILENAME
% git commit -m "second commit"
% git push -u origin master

You can also do all in one go with -a which adds all files to working area

% git commit -am 'new commit'

unstage changes

this command unstage hello.rb, -- starts file path argument

% git reset HEAD -- hello.rb

remove files from the staging area, use --cached to leave file on disk.

% git rm FILENAME

revert a file to last checked version

% git checkout FILENAME

diff

show diff of unstaged changes. So where git status will show you what files have changed and/or been staged since your last commit, git diff will show you what those changes actually are, line by line.

% git diff

--cached show diff of staged changes which goes to the next commit snapshot
HEAD difference between your working directory and the last commit
--stat show summary of changes instead of a full diff
branchA...branchB compare two divergent branches

inspection and comparison

look for commits from a specific author

% git log --author

by date authored

% git log --since={2010-04-18}
% git log --before={3.weeks.ago}
% git log --until='5 minutes ago'
% git log --after=

by commit message. Git will logically OR all --grep and --author arguments.
--all-match to match all instead
--format="%h %an %s" to modify output format

% git log --grep

filter by introduced diff. tell Git to look through the diff of each commit for a string.

% git log -Sstring

show patch introduced at each commit. git show [SHA] do the same with a specific commit SHA

% git log -p

show diffstat of changes introduced at each commit. summary of the changes, less verbose then -p

% git log --stat    

branching and merging

list branches

% git branch

create a new branch and switch to it

% git branch BRANCH
% git checkout BRANCH

or you can create and checkout in one go with -b

% git -b branch BRANCH

delete a branch

% git branch -d BRANCH

merge a branch context into your current one

% git merge BRANCH

show commit history of a branch
--oneline for a compact output
--graph for a topology view
^otherbranch to exclude otherbranch from report
--decorate to display tags

% git log BRANCH

tag a point in history as important. To tag last commit (HEAD) as v1.0
If you need to tag another commit specify the commit SHA as last argument.

% git tag -a v1.0

clone a GitHub repo

% git clone git://github.com/schacon/simplegit.git

sharing and updating

list remote repository aliases. Git repositories are all equal and you simply synchronize between them. This command help manage alias or nickname for each remote repository URL to avoid using full URL every time

% git remote -v

-v to display full URLs

create a new alias for a remote repository, alias names are arbitrary

% git remote add ALIAS URL

removing an existing remote alias

% git remote rm ALIAS

download new branches and data from a remote repository.

% git fetch

fetch from a remote repo and try to merge into the current branch. Run a git fetch immediately followed by a git merge of the branch on that remote that is tracked by whatever branch you are currently in. Prefer running it separatly instead.

--all synchronize with all of your remotes

% git pull

push your new branches and data to a remote repository. If someone else has pushed since you last fetched and merged, the Git server will deny your push until you are up to date.

% git push ALIAS BRANCH

push a cloned Repo to your own GitHub account

% git remote add github https://github.com/USERNAME/REPONAME.git
% vi .gitignore
% git add -A
% git commit -m "Initial commit from clone"
% git push github

rename github to origin [avoid name argument while pushing, origin is defaut]

% git remote rename origin upstream
% git remote rename github origin

pull in upstream changes

Fetches any new changes from the upstream repository

git fetch upstream
git merge upstream/master

or if you are in a hurry, you can do it in one step.

git pull upstream

Beware all changes will be merged by default to the current branch.
You can do a Rebase instead, which is a way to re-integrate two branches by simulating each developer taking turns coding. So when Rebasing, your commits will be put on the side while pulling origin commits, your commits will then be re-integrated at the end of the process. Provides simplicity in the code history. It’s like if you were redoing the work in a millisecond after Pulling from origin.

git pull --rebase

git config branch.autosetuprebase always to set this on by default with

pull request

Let’s assume you’ve forked a repository and pushed your changes. You can now initiate a pull request

  1. switch to the branch you want someone else to pull
  2. click pull request
  3. fillout the form and send it

reuse recorded resolution – rerere of conflicted merge

git config --global rerere.enabled true enable rerere
git merge origin/newbranch imagine a conflict happen now, you can now use
git rerere status to list file observed by rerere
git rerere diff to see differences
vi <conflicts> to resolve conflict
git commit -a -m'Resolved the merge conflict' that’s it it’s resolved and recorded by rerere
git rerere gc to clean things a bit, forget older then 15 days recording but shouln’t be necessary.
.git/rr-cache file stored there, not part of push/pull mechanism, stays on your machine
git rerere clean to delete all recorded resolution
git rerere forget path/to/file to delete a recorded resolution, each one of them is attached to a specific file