Infrastructure Management with SaltStack – Grains, States, and Pillar

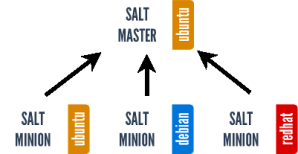
diagram-basic1

Introduction

This post is all about targeting minions and configuration management. Up to now every time we have invoked a command on a minion we have used the syntax salt "*" module.command. The "*" glob is the global target. It targets every minion who’s private key is currently accepted by the master. While this is useful for a few things we are going to need a way target systems on a more ganular basis. For this we havegrains.

Selective Targeting of Minions

The grains program runs on each minion node collecting system data and storing it in memory for fast retrieval. To list all available grain items and their current settings running the following command:

salt "*" grains.items

Example Output:
Salt-201
Salt-202

Salt has been nice enough to color code the output to make it easy to understand. Everything in blue is the key and everything in green is the value, of the key:value pair.

Let’s begin selectively targeting minions on the command line by matching a certain value of a named key. Matching can be done verbatim or with a glob.

To invoke filtering by grain match while using an Execution Module with the salt CLI command the -Gswitch is used. For example, to select all minions running the Ubuntu OS we could run the following command:

salt -G 'os:Ubunt*' test.ping

Salt-203

In the second command above we see that we can return one “grain” with the argument grains.itemitem.

Now we can target minions and return system data. Let’s expand on that knowledge with the State System.

The State of Configuration Management

The State System is how Salt executes configuration management. The State System is built on two things, SLS Formula files written in YAML and the state.sls Execution Module.

SLS formulas are like Puppet manifests or Chef recipes. They contain structured data that instruct the minion to “be” a certain way. Here are a few examples of that can be contained in a formula:

    pkg: installs a package
    service: starts a service
    user.present: create a user
    file.managed: copy a file and maintain metadata.

Formulas are stored under the /srv/salt directory. A complex directory structure is supported with multiple target minions through the use of the top.sls file. It is detailed and requires explanation. Read the doc here.

Let’s step though an example apache.sls formula:

salt203

The first line names the formula.

apache:

Next the apache httpd package is confirmed to be installed, if it is not then the package manager installs it.

  pkg:
    - installed

The service key makes sure that the httpd service is running. Also there is the watch key word. Used in this context, it will monitor for changes to the package, config file, or the apache user. If found it will resart thehttps service.

  service:
    - running
    - watch:
      - pkg: apache
      - file: /etc/httpd/conf/httpd.conf
      - user: apache

The user.present and group.present key words setup the apache user and group. if these already exist, this will confirm the settings and change them if needed to conform. Also, notice the require key word. Require is a way to enforce order. By group requiring pkg it will be executed after. The same understanding applies to user and group. This is also transitive so user will execute after pkg

Also notice the form user.present. There is also an inverse user.absent that removes a user. Group has a similar construct.

  user.present:
    - uid: 87
    - gid: 87
    - home: /var/www/html
    - shell: /bin/nologin
    - require:
      - group: apache
  group.present:
    - gid: 87
    - require:
      - pkg: apache

The next section is a managed file. The first line is the path to the file on the minion node. The source key word specifies the file on the salt-master that will be copied. The default root of salt:// is /srv/salt

/etc/httpd/conf/httpd.conf:
file.managed:
- source: salt://apache/httpd.conf
- user: root
- group: root
- mode: 644

Read more about the State System here.

It is important to note that the values we have set so far in the formula are all literals. To set variables we need to invoke the pillar system.

A Pillar of Salt

Pillars can be best explained as the reverse of grains. Grains contains information about minions generated by the minion. Pillars contain information about minions defined on the master.

These can be several things. Variables for states or static init data for multiple minions can both be stored in pillars. Pillars can also exist in a tree configuration almost identical to how the state tree. The is also a topfile for Pillar. The root of the Pillar system is /srv/pillar.

The Pillar system, like most of Salt, starts simple and can get very complex. If you need this system I suggest you know what you a getting into. Read the SaltStack docs here.  

You should now have a better understanding of Salt. Stay tuned until next time where we go further down the Salt mine with Events and the Reactor System.

SALT STACK INSTALLATION – SCREEN SHOTS

saltstack_logo

Introduction

Lately there is quite a bit of talk in IT circles about devops and programmatic configuration management. During these conversations two names come up over and over, Puppet by Puppet Labs and Chef (née Opscode). There is a third option that deserves attention as well, Salt by SaltStack.

Salt was developed by Tom Hatch and first released in 2011. Unlike the Ruby based Puppet and Chef it written in Python. Salt’s goal is to provide simple, yet deeply flexible infrastructure management at extremely high speeds and at an enterprise scale. It is this goal that sets it apart from the others.

How It Works

The core of Salt is a client-server design. Several agent daemons, called “minions”, are controlled by a “master” daemon. These masters can then be aggregated allowing for the possibility of tens of thousands of nodes in an enterprise. All network communication is encrypted by a pre-approved shared key.

Salt uses the Python ZeroMQ messaging library to accomplish its tasks at high speeds.

The salt-master runs Execution Modules against the salt-minions to remotely execute commands. The master leverages a similar system to manage “States”. The State system is responsible for configuration management.

The minions run a program called “grains” which is similar to facter. Grains contains system information about the minion controlled node and stores the information in memory for fast retrieval. More security sensitive information as well as global variables  are stored and accessed with the Pillar system.

Salt has an is built upon an extensive series of module systems here are a few:

  • An extensive Cloud management system built upon Apache Libcloud. Controlling Amazon, Rackspace, Google, OpenStack and nodes from 30 other providers is fully supported and well documented.
  • A Job Management system (via minion proc) and a reactionary event system aptly called Reactorhandle automation, job scheduling, and event response.
  • What is Salt with out a Mine? The Mine system handles issues with time sensitive data where age matters.
  • The Salt Virt system covers all your hypervisor needs.

Oh yeah, and it support Windows Server too. That’s right, Windows.

Installing the salt-master and salt-minion

1. Deploy 2 Virtual Machines with Ubuntu 12.04 LTS (“Precise Pangolin”). One will be the master and one will be in the minion.

2. Connect to each with PuTTy and log in with the user created during install.

Run These Commands on Both Servers:

3. Change user to root.

sudo su -

salt-001

4. Install the python-software-properties package.

apt-get install python-software-properties

salt-002

5. Add the SaltStack Repository.

add-apt-repository ppa:saltstack/salt

salt-003

6. Update the package management database.

apt-get update

salt-004

Run This Command on the salt-master Server:

7. Install salt-master.

apt-get install salt-master

salt-005

Run These Commands on the salt-minion Server:

8. Install salt-minion.

apt-get install salt-minion

salt-006

9. Edit the file /etc/salt/minion with vi. Find the line “#master: salt”. Delete the “#”. Change
“salt” to the FQDN or IP of the salt-master server.

vi /etc/salt/minion

Note: To edit the file type “i”. To save and exit type “:wq” and “enter”.

salt-007

The file should look like this:

salt-008

10. Restart the salt-minion daemon.

service salt-minion restart

salt-009

Run These Commands on the salt-master Server:

11. Add the minion’s private key to the salt-master. “-L” lists all keys. “-A” accepts all new keys.

salt-key -L
salt-key -A

salt-010

12. Test the connection with test.ping Execution Module. The result should return true.

salt "*" test.ping

salt-011

The salt-master now has the ability to remotely execute against the salt-minion. Here are a couple of simple things it can do:

Return Disk Usage:

salt "*" disk.usage

salt-012

Run Remote Commands:

salt "*" cmd.run "ls /var/log -la"

salt-013
Install the git package:

salt "*" pkg.install git

salt-014

Conclusion

Running the salt command from the CLI is just the beginning. I’ll continue to explore the deeper abilities of Salt in upcoming posts.

SALT STACK – Installation on Windows

Hi Readers,

Its Continuing from SALT SERVER -UBUNTU, copy and open link address,

Here we are going to discuss how to install SALT on windows,

Salt has full support for running the Salt Minion on Windows.

There are no plans for the foreseeable future to develop a Salt Master on Windows. For now you must run your Salt Master on a supported operating system to control your Salt Minions on Windows.

Many of the standard Salt modules have been ported to work on Windows and many of the Salt States currently work on Windows, as well.

WINDOWS INSTALLER

Salt Minion Windows installers can be found here. The output of md5sum <salt minion exe> should match the contents of the corresponding md5 file.

Click SALT- MINION WINDOWS Set up 


SILENT INSTALLER OPTION

The installer can be run silently by providing the /S option at the command line. The options /masterand /minion-name allow for configuring the master hostname and minion name, respectively. Here’s an example of using the silent installer:

Salt-Minion-0.17.0-Setup-amd64.exe /S /master=yoursaltmaster /minion-name=yourminionname

SETTING UP A WINDOWS BUILD ENVIRONMENT

TESTING THE SALT MINION

After installing SALT packages,

  • Edit C:\salt\conf\minion >> “Enter the ipaddress or hostname  of your salt-master “


Note : Ports for SALT Communication is 4505 & 4506. Which is to opened on firewall


You can check it on Salt.conf file.

SALT STACK INSTALLATION & CONFIG – Ubuntu 12.04

Introduction

Salt is an awesome 100% open source configuration management and remote
execution tool. Salt is a new approach to infrastructure management. Easy
enough to get running in minutes, scalable enough to manage tens of thousands of servers, and fast enough to communicate with them in seconds.

In this article we will accomplish the following:

  • Install a Salt Master and a Salt Minion on running Ubuntu 12.04
  • Install salt minion on running Windows server 2008 R2

ADD REPOSITORY

The latest packages for Ubuntu are published in the saltstack PPA. If you have the add-apt-repositoryutility, you can add the repository and import the key in one step:

sudo add-apt-repository ppa:saltstack/salt

add-apt-repository: command not found?

The add-apt-repository command is not always present on Ubuntu systems. This can be fixed by installing python-software-properties:

sudo apt-get install python-software-properties

Note that since Ubuntu 12.10 (Raring Ringtail), add-apt-repository is found in the software-properties-common package, and is part of the base install. Thus, add-apt-repository should be able to be used out-of-the-box to add the PPA.

Alternately, manually add the repository and import the PPA key with these commands:

echo deb http://ppa.launchpad.net/saltstack/salt/ubuntu `lsb_release -sc` main | sudo tee /etc/apt/sources.list.d/saltstack.list
wget -q -O- "http://keyserver.ubuntu.com:11371/pks/lookup?op=get&search=0x4759FA960E27C0A6" | sudo apt-key add -

After adding the repository, update the package management database:

sudo apt-get update

INSTALL PACKAGES

Install the Salt master, minion, or syndic from the repository with the apt-get command. These examples each install one daemon, but more than one package name may be given at a time:

sudo apt-get install salt-master
sudo apt-get install salt-minion
sudo apt-get install salt-syndic

Configuring Salt

Salt configuration is very simple. The default configuration for the master will work for most installations and the only requirement for setting up a minion is to set the location of the master in the minion configuration file.

The configuration files will be installed to /etc/salt and are named after the respective components,/etc/salt/master and /etc/salt/minion.

MASTER CONFIGURATION

By default the Salt master listens on ports 4505 and 4506 on all interfaces (0.0.0.0). To bind Salt to a specific IP, redefine the “interface” directive in the master configuration file, typically/etc/salt/master, as follows:

- #interface: 0.0.0.0
+ interface: 10.0.0.1

After updating the configuration file, restart the Salt master. See the master configuration reference for more details about other configurable options.

MINION CONFIGURATION

Although there are many Salt Minion configuration options, configuring a Salt Minion is very simple. By default a Salt Minion will try to connect to the DNS name “salt”; if the Minion is able to resolve that name correctly, no configuration is needed.

If the DNS name “salt” does not resolve to point to the correct location of the Master, redefine the “master” directive in the minion configuration file, typically /etc/salt/minion, as follows:

- #master: salt
+ master: 10.0.0.1

After updating the configuration file, restart the Salt minion. See the minion configuration reference for more details about other configurable options.

RUNNING SALT

  1. Start the master in the foreground (to daemonize the process, pass the -d flag):

    salt-master
    
  2. Start the minion in the foreground (to daemonize the process, pass the -d flag):

    salt-minion
    

Having trouble?

The simplest way to troubleshoot Salt is to run the master and minion in the foreground with log level set to debug:

salt-master --log-level=debug

For information on salt’s logging system please see the logging document.

Run as an unprivileged (non-root) user

To run Salt as another user, set the user parameter in the master config file.

Additionally, ownership and permissions need to be set such that the desired user can read from and write to the following directories (and their subdirectories, where applicable):

  • /etc/salt
  • /var/cache/salt
  • /var/log/salt
  • /var/run/salt

More information about running salt as a non-privileged user can be found here.

There is also a full troubleshooting guide available.

KEY MANAGEMENT

Salt uses AES encryption for all communication between the Master and the Minion. This ensures that the commands sent to the Minions cannot be tampered with, and that communication between Master and Minion is authenticated through trusted, accepted keys.

Before commands can be sent to a Minion, its key must be accepted on the Master. Run the salt-keycommand to list the keys known to the Salt Master:

[root@master ~]# salt-key -L
Unaccepted Keys:
alpha
bravo
charlie
delta
Accepted Keys:

This example shows that the Salt Master is aware of four Minions, but none of the keys has been accepted. To accept the keys and allow the Minions to be controlled by the Master, again use the salt-key command:

[root@master ~]# salt-key -A
[root@master ~]# salt-key -L
Unaccepted Keys:
Accepted Keys:
alpha
bravo
charlie
delta

The salt-key command allows for signing keys individually or in bulk. The example above, using -Abulk-accepts all pending keys. To accept keys individually use the lowercase of the same option, -akeyname.

See also

salt-key manpage

SENDING COMMANDS

Communication between the Master and a Minion may be verified by running the test.pingcommand:

[root@master ~]# salt alpha test.ping
alpha:
    True

Communication between the Master and all Minions may be tested in a similar way:

[root@master ~]# salt '*' test.ping
alpha:
    True
bravo:
    True
charlie:
    True
delta:
    True

Each of the Minions should send a True response as shown above.