what is Tacker?
Tacker is an official OpenStack project building a Generic VNF Manager (VNFM) and a NFV Orchestrator (NFVO) to deploy and operate Network Services and Virtual Network Functions (VNFs) on an NFV infrastructure platform like OpenStack. It is based on ETSI MANO Architectural Framework and provides a functional stack to Orchestrate Network Services end-to-end using VNFs.
High Level Architecture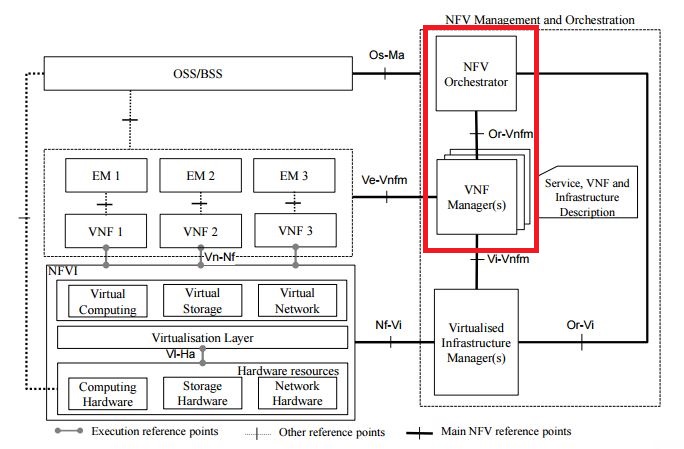
To know more about architecture click Tacker
Installation on single node setup (Devstack)
1) Pull devstack repo either master or any stable releases ( do “git clone -b stable/<stable release name>
Note: supported from the Openstack Kilo Release.
git clone https://github.com/openstack-dev/devstack
3) A sample local.conf is placed at https://raw.githubusercontent.com/openstack/tacker/master/devstack/samples/local.conf.example. Copy the local.conf to devstack root directory and customize it based on your environment settings. Update the HOST_IP to the IP address of VM or host where you are running tacker.
Note 1: Ensure local.conf file has the “enable_plugin tacker” line and it is pointing to master.
4) Run stack.sh
Installation on Multinode setup:
Prerequisites:
- Hardware: minimum 8GB RAM, Ubuntu (version 14.04)
- Ensure that OpenStack components Keystone, Glance, Nova, Neutron, Heat and Horizon are installed.
- Git & Python packages should be installed
sudo apt-get install python-pip git
Steps:
- Create Client environment source file
export OS_PROJECT_DOMAIN_ID=default
export OS_USER_DOMAIN_ID=default
export OS_PROJECT_NAME=admin
export OS_TENANT_NAME=admin
export OS_USERNAME=admin
export OS_PASSWORD=ADMIN_PASS
export OS_AUTH_URL=http://controller:35357/v3
export OS_IDENTITY_API_VERSION=3
Ensure entry for extensions drivers in /etc/neutron/plugins/ml2/ml2_conf.ini Restart neutron services after the below entry has been added.[ml2] extension_drivers = port_security
Modify heat’s policy.json file under /etc/heat/policy.json file to allow users in non-admin projects with ‘admin’ roles to create flavors."resource_types:OS::Nova::Flavor": "role:admin"
Install Tacker server
Before you install and configure Tacker server, you must create a database, service credentials, and API endpoints.
- To create the database, complete these steps:
- Use the database access client to connect to the database server as the root user:
mysql -u root -p
- Create the tacker database:
create database tacker;
- Grant proper access to the tacker database:
GRANT ALL PRIVILEGES ON tacker.* TO 'tacker'@'localhost' \

IDENTIFIED BY 'TACKER_DBPASS';

GRANT ALL PRIVILEGES ON tacker.* TO 'tacker'@'%' \

IDENTIFIED BY 'TACKER_DBPASS';
Replace ‘TACKER_DBPASS’ with a suitable password.
- Exit the database access client.
- Source the admin credentials to gain access to adminonly CLI commands:
source admin-openrc.sh
- To create the service credentials, complete these steps:
- Create the tacker user:
openstack user create --domain default --password <PASSWORD> tacker- Replace <PASSWORD> with a suitable password
- Add the admin role to the tacker user:
openstack role add --project services --user tacker admin
Note: Project_name can be service or services. Verify the project_name under [keystone_authtoken] section in the /etc/nova/nova.conf file.- Create the tacker service
openstack service create --name tacker --description "nfv-orchestration" servicevm- Create the tacker service API endpoints:
openstack endpoint create --region RegionOne <Service Type or Service ID> public http:// <TACKER_NODE_IP> :8888

openstack endpoint create --region RegionOne <Service Type or Service ID> admin http:// <TACKER_NODE_IP> :8888

openstack endpoint create --region RegionOne <Service Type or Service ID> internal http:// <TACKER_NODE_IP> :8888
- Clone tacker repository
git clone -b stable/liberty https://github.com/openstack/tacker
- 5. Install all requirements. The requirements.txt file contains a set of python-packages required to run Tacker-Server
cd tacker sudo pip install -r requirements.txt
Note: If OpenStack components mentioned in pre-requisites section have been installed, the below command would be sufficient. cd tacker sudo pip install tosca-parser
- Install tacker
sudo python setup.py install
- Create ‘tacker’ directory in ‘/var/log’
Note:The above referenced path ‘/var/log’ is for Ubuntu and may be different for other Operating Systems.sudo mkdir /var/log/tacker
- Edit tacker.conf to ensure the below entries:
Note:
- In Ubuntu 14.04, the tacker.conf is located at /usr/local/etc/tacker/ and below ini sample is for Ubuntu and directory paths referred in ini may be different for other Operating Systems.
- Project_name can be service or services. Verify the project_name in [keystone_authtoken] section in the /etc/nova/nova.conf file.
[DEFAULT]

auth_strategy = keystone

policy_file = /usr/local/etc/tacker/policy.json

debug = True

use_syslog = False

state_path = /var/lib/tacker

...

[keystone_ authtoken]

project_name = services

password = <TACKER_SERVICE_USER_PASSWORD>

auth_url = http://<KEYSTONE_IP>:35357

identity_uri = http://<KEYSTONE_IP>:5000

auth_uri = http://<KEYSTONE_IP>:5000   ...

[agent]

root_helper = sudo /usr/local/bin/tacker-rootwrap

/usr/local/etc/tacker/rootwrap.conf

...

[DATABASE]

connection =

mysql://tacker:<TACKERDB_PASSWORD>@<MYSQL_IP>:3306/tacker?charset=utf8

...

[servicevm_nova]

password = <NOVA_SERVICE_USER_PASSWORD>

auth_url = http://<NOVA_IP>:35357

...

[servicev m_heat]

heat_uri = http://<HEAT_IP>:8004/v1
- Populate Tacker database:
Note:The below command is for Ubuntu Operating System/usr/local/bin/tacker-db-manage --config-file /usr/local/etc/tacker/tacker.conf upgrade head
Install Tacker client
- Clone tacker-client repository.
cd ~/

git clone -b stable/liberty https://github.com/openstack/python-tackerclient
- Install tacker-client.
cd python-tackerclient

sudo python setup.py install
Install Tacker horizon
- Clone tacker-horizon repository.
cd ~/

git clone -b stable/liberty https://github.com/openstack/tacker-horizon
- Install horizon module.
cd tacker-horizon

sudo python setup.py install
- Enable tacker horizon in dashboard.
Note:The below destination path referred is for Ubuntu 14.04 and may change for other Operating Systems.sudo cp openstack_dashboard_extensions/* /usr/share/openstack-dashboard/openstack_dashboard/enabled/
- Restart Apache server
sudo service apache2 restart
Starting Tacker server
Note:Ensure that ml2_conf.ini as per Step 4 from the pre-requisites section has been configured.
sudo python /usr/local/bin/tacker-server --config-file /usr/local/etc/tacker/tacker.conf --log-file /var/log/tacker/tacker.log &
Testing Tacker
Run the following tacker commands to verify whether tacker is working finetacker ext-list
tacker vnf-list
tacker device-list
A simple set of vnfd-create, vnf-create and vnf-update commands are shown below.
tacker vnfd-create –name ${VNFD_NAME} –vnfd-file ${VNFD_TOSCA_YAML-FILE}
tacker vnf-create –name vnf-name –vnfd-id ${VNFD_ID}
tacker vnf-update –config “${CONFIG_DATA_YAML} ${VNF_ID}
If command-line tacker works fine, try out Tacker using Horizon (NFV left menu entry)
Now Tacker is ready, start to play !!